Thunderbird: Difference between revisions
Jump to navigation
Jump to search
| (9 intermediate revisions by the same user not shown) | |||
| Line 1: | Line 1: | ||
==Video Instructions== | ==Video Instructions (For Thunderbird Version 78)== | ||
{| style="width: 100%; border-spacing:15px; border-collapse:separate; border: 1px solid rgb(191, 238, 255); background-color: rgb(255, 235, 205); text-align:center; font-size:1.5em;" | {| style="width: 100%; border-spacing:15px; border-collapse:separate; border: 1px solid rgb(191, 238, 255); background-color: rgb(255, 235, 205); text-align:center; font-size:1.5em;" | ||
|- valign="center" | |- valign="center" | ||
| Line 17: | Line 17: | ||
|- | |- | ||
|style="width: 50%"| | |style="width: 50%"| | ||
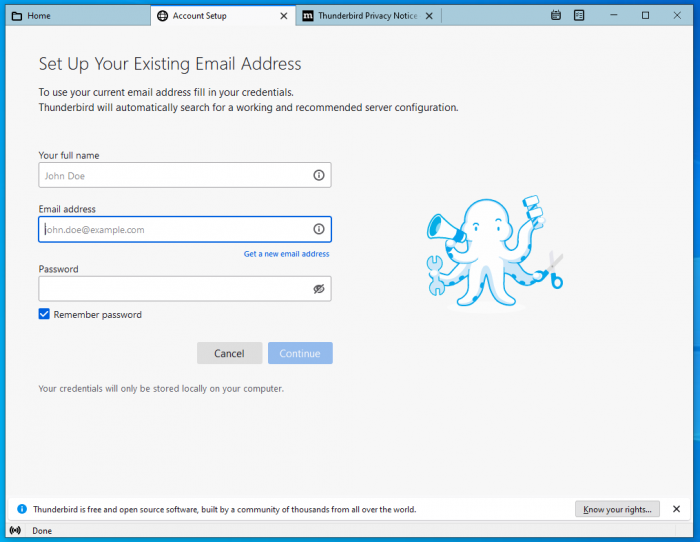
*If this is your first time starting Thunderbird, it should automatically come up with a <code>Set Up Your Existing Email Account</code> page as shown in the image. If you already have accounts set up and are looking to add another, click on <code>Local Folders</code> in the lefthand menu bar and then <code>Email</code> under "Set Up Another Account" | |||
*If this is your first time starting Thunderbird, it should automatically come up with a <code>Set Up | *Enter your Name, Email and Password and click on Continue | ||
|[[File:Tbemail1.png|centre|700px]] | |[[File:Tbemail1.png|centre|700px]] | ||
|- | |- | ||
|[[File:Tbemail2.png|centre|700px]] | |[[File:Tbemail2.png|centre|700px]] | ||
| | | | ||
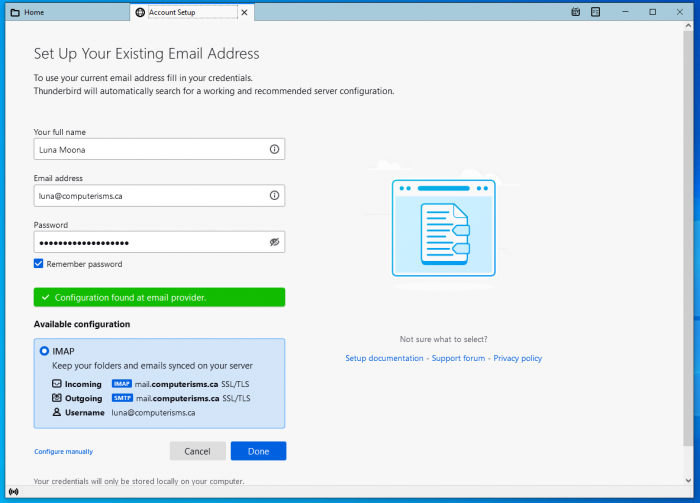
*Verify that the server settings say the following (replacing domain.tld with your Computerisms hosted domain): | |||
*Verify that the server settings say the following (replacing domain.tld with your domain): | **Incoming: IMAP mail.domain.tld SSL/TLS | ||
**Incoming: IMAP mail.domain.tld SSL | **Outgoing: SMTP mail.domain.tld SSL/TLS | ||
**Outgoing: SMTP mail.domain.tld | |||
**Username: youremailaddress@domain.tld | **Username: youremailaddress@domain.tld | ||
*If everything looks good, hit <code>Done</code>, and your setup should be done! If not, click on <code> | *If everything looks good, hit <code>Done</code>, and your setup should be done! If not, click on <code>Configure manually</code> | ||
|- | |- | ||
| | | | ||
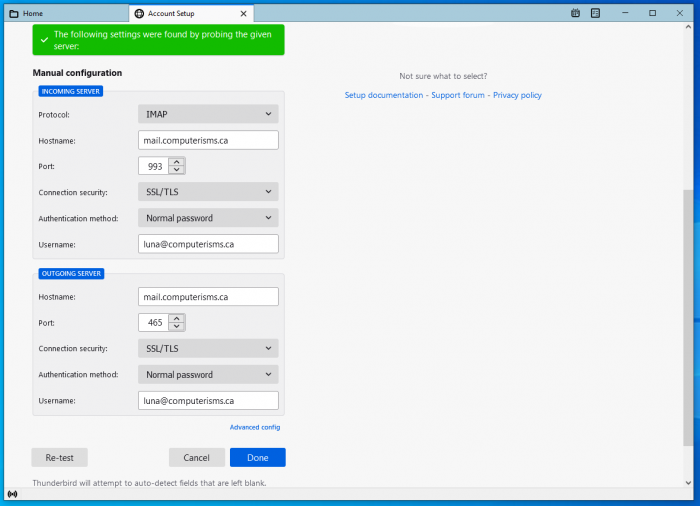
*Make sure the | *Make sure the Hostname for both Incoming and Outgoing Server is set to mail.domain.tld | ||
**If you are configuring IMAP, select <code> | **If you are configuring IMAP, select <code>IMAP</code> under the protocol dropdown in the Incoming server section, select <code>SSL/TLS</code> for Connection Security, use port <code>993</code>, and Normal Password authentication. | ||
**If you are configuring POP3, select <code> | **If you are configuring POP3, select <code>POP3</code> under the protocol dropdown in the Incoming server section, select <code>SSL/TLS</code> for Connection Security, use port <code>995</code>, and Normal Password authentication. (Note that we do not suggest POP3 setups except in special cases, ask us for more info if needed) | ||
**For SMTP, select <code> | **For SMTP, select <code>SSL/TLS</code>, use port <code>465</code> and Normal Password authentication. | ||
<br> | <br> | ||
*Make sure that for the Username under both Incoming and Outgoing your <b>full email address</b> is filled in | *Make sure that for the Username under both Incoming and Outgoing your <b>full email address</b> is filled in | ||
*Click on Done | *Click on Re-test, and if you see a message like the one in the green box in the picture, hit Done | ||
*Your email is now setup! If you'd like, send a email to yourself to test functionality | *Your email is now setup! If you'd like, send a email to yourself to test functionality | ||
|[[File:Tbemail3.png|centre|700px]] | |[[File:Tbemail3.png|centre|700px]] | ||
| Line 50: | Line 49: | ||
|- | |- | ||
|style="width: 50%"| | |style="width: 50%"| | ||
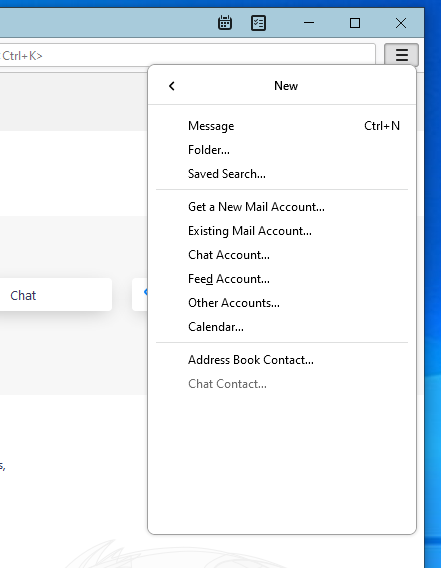
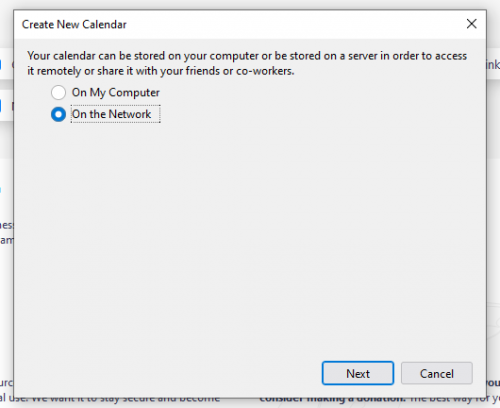
*Open your Thunderbird email client and click the | *Open your Thunderbird email client and click the Hamburger Menu icon next to the search bar (three lines stacked on top of one another) | ||
*Select New, and then select Calendar | *Select <code>New</code>, and then select <code>Calendar...</code> | ||
|[[File:Help.tbird.cal.new.cal.1.png|center|500px]] | |[[File:Help.tbird.cal.new.cal.1.png|center|500px]] | ||
|- | |- | ||
| Line 59: | Line 58: | ||
|- | |- | ||
| | | | ||
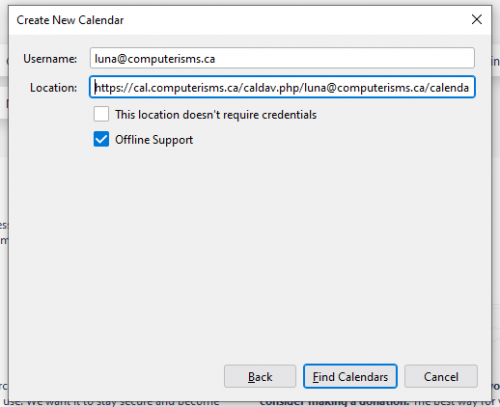
* | *Enter in your email address in the Username box | ||
*The value you need to enter for Location consists of two parts | *The value you need to enter for Location consists of two parts: | ||
**The first part is based on your domain name in the format [[Domain Substitution|https://cal.domain.tld]] | **The first part is based on your domain name in the format [[Domain Substitution|https://cal.domain.tld]] | ||
**The second part is your DAV Path as derived from configuring your [[Calendar]] | **The second part is your DAV Path as derived from configuring your [[Calendar]] | ||
**If you are connecting to someone else's calendar, you will need to use the [[Calendar#I Need My Assistant To Edit My Calendar|DAV Path]] they provide you | **If you are connecting to someone else's calendar, you will need to use the [[Calendar#I Need My Assistant To Edit My Calendar|DAV Path]] they provide you | ||
**The full value will look like this: [[Domain Substitution|https://cal.domain.tld/caldav.php/bob@computerisms.ca/calendar]] | **The full value will look like this: [[Domain Substitution|https://cal.domain.tld/caldav.php/bob@computerisms.ca/calendar]] | ||
*Put a check mark beside | *Put a check mark beside <code>Offline Support</code> if you want to be able to read this calendar when you are not connected to the internet | ||
* | *Click on Find Calendars and let it search | ||
|[[File:Help.tbird.cal.new.cal.3.png|center|500px]] | |[[File:Help.tbird.cal.new.cal.3.png|center|500px]] | ||
|- | |- | ||
|[[File:Help.tbird.cal.new.cal.4.png|center|500px]] | |[[File:Help.tbird.cal.new.cal.4.png|center|500px]] | ||
| | | | ||
*At this point, Thunderbird will want you to | *At this point, Thunderbird will want you to type your password to access the calendar | ||
** | **This is the same password as you use to log into your email account | ||
*Select <code>USe Password Manager to remember this password.</code> to allow Thunderbird to save the password for later use (so it doesn't have to prompt you every time the calendar syncs) | |||
|- | |- | ||
| | | | ||
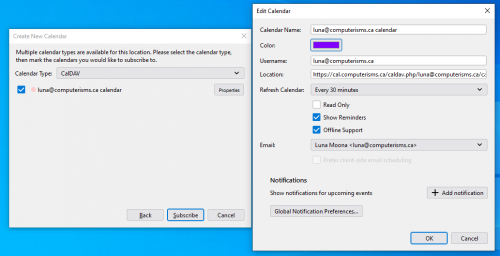
*If Thunderbird | *Thunderbird should have detected your Calendar and be asking for Calendar Type; You want to select CalDAV for use with our calendar system | ||
*If you wish to change anything about the calendar in Thunderbird itself (Name, Colour, Reminder Support, Read Only, etc) click on <code>Properties</code> next to the calendar and edit to your hearts content | |||
|[[File:Help.tbird.cal.new.cal.5.png|center|500px]] | |[[File:Help.tbird.cal.new.cal.5.png|center|500px]] | ||
|- | |- | ||
|[[File:Help.tbird.cal.new.cal.6.png|center|500px]] | |[[File:Help.tbird.cal.new.cal.6.png|center|500px]] | ||
| | | | ||
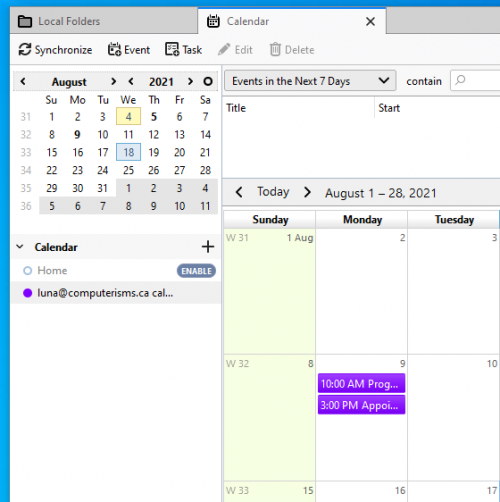
* | *Once done, click on <code>Subscribe</code>! Congrats, your calendar has been added to Thunderbird | ||
|- | |- | ||
|} | |} | ||
==Shared Address Book== | ==Shared Address Book== | ||
{| style="width:100%" border="0" cellspacing="0" cellpadding="20" style="font-size:120%; | {| style="width:100%" border="0" cellspacing="0" cellpadding="20" style="font-size:120%; | ||
|- | |- | ||
|style="width: 50%"| | |style="width: 50%"| | ||
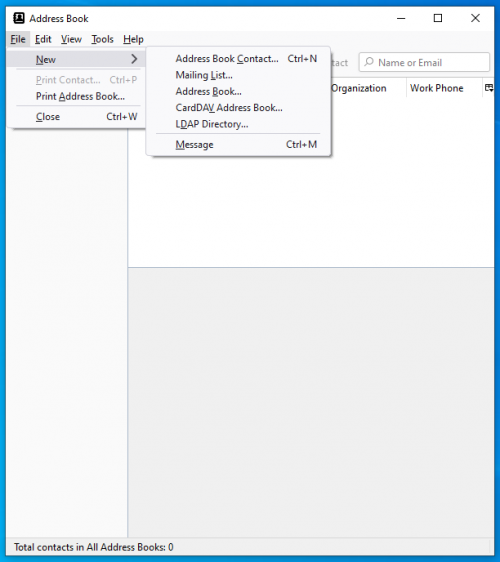
*Open your Thunderbird email client and | *Open your Thunderbird email client, navigate to the main email overview tab (where you see all your emails from various accounts and folders, and select <code>Address Book</code> from the items in the upper row (near Write) | ||
* | *In the upper bar, select <code>File</code>, then <code>New</code>, and then <code>CardDAV Address Book...</code> | ||
|[[File:Thunderbird_contactbook_1.png|center|500px]] | |[[File:Thunderbird_contactbook_1.png|center|500px]] | ||
|- | |- | ||
|[[ | |[[File:Thunderbird_contactbook_3.png|center|500px]] | ||
| | | | ||
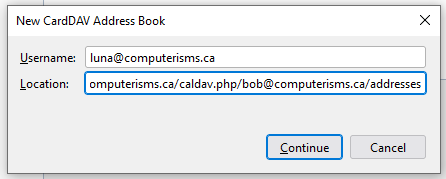
* | *Type in your email address into the Username field | ||
*The value you need to enter for Location consists of two parts | |||
*The value you need to enter for | |||
**The first part is based on your domain name in the format [[Domain Substitution|https://cal.domain.tld]] | **The first part is based on your domain name in the format [[Domain Substitution|https://cal.domain.tld]] | ||
**The second part is your DAV Path as derived from configuring your [[Calendar]] | **The second part is your DAV Path as derived from configuring your [[Calendar]] | ||
**If you are connecting to someone else's address book, you will need to use the [[Calendar#I Need My Assistant To Edit My Calendar|DAV Path]] they provide you | **If you are connecting to someone else's address book, you will need to use the [[Calendar#I Need My Assistant To Edit My Calendar|DAV Path]] they provide you | ||
**The full value will look like this: [[Domain Substitution|https://cal.domain.tld/caldav.php/bob@computerisms.ca/addresses]] | **The full value will look like this: [[Domain Substitution|https://cal.domain.tld/caldav.php/bob@computerisms.ca/addresses]] | ||
*Click on <code>Continue</code> | |||
|- | |||
| | |||
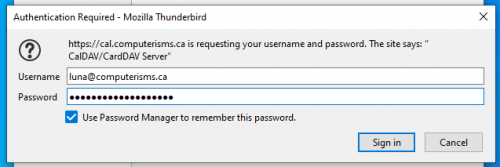
*The Username and Password should be your email address and email password, unless otherwise specified | *The Username and Password should be your email address and email password, unless otherwise specified | ||
*Click on | *Click on <code>Sign in</code> and if the password checks out you'll be returned to the main <code>Add a CalDAV Calendar</code> window. | ||
|[[File:Thunderbird_contactbook_4.png|center|500px]] | |[[File:Thunderbird_contactbook_4.png|center|500px]] | ||
|- | |- | ||
|[[File:Thunderbird_contactbook_5.png|center|500px]] | |[[File:Thunderbird_contactbook_5.png|center|500px]] | ||
| | | | ||
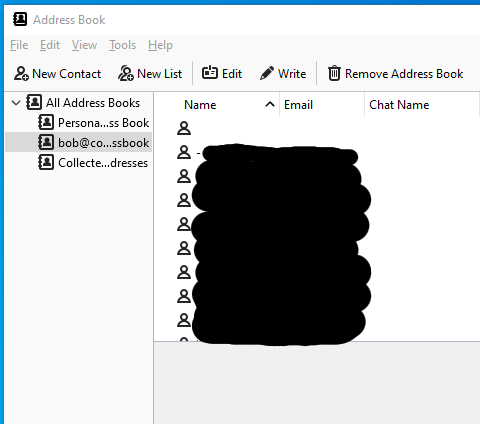
* | *If the addressbook you were trying to access shows up under <code>Available address books</code> in the main New CalDAV window, then it worked. Click on Continue and your address book should now be available under the <code>All Address Books</code> category | ||
|- | |- | ||
|} | |} | ||
==Extra Notes== | ==Extra Notes== | ||
Latest revision as of 22:26, 18 August 2021
Video Instructions (For Thunderbird Version 78)

|
|||
| Calendar | Address Book |
How to Setup your Computerisms Hosted Email on Thunderbird
Calendar
Before you begin:
- You will need the DAV Path found on the server or the DAV Path from some else's Calendar
|
 |
 |
|
|
 |
 |
|
|
 |
 |
|
|
 |
 |
|
|
 |
 |
|
