Email: Difference between revisions
Jump to navigation
Jump to search
| (105 intermediate revisions by 6 users not shown) | |||
| Line 1: | Line 1: | ||
== | ==Instructions For Configuring Email Clients== | ||
{| style="width: 100%; border-spacing:15px;border-collapse:separate;border: 1px solid rgb(191, 238, 255); background-color: rgb( | {| style="width: 100%; border-spacing:15px;border-collapse:separate;border: 1px solid rgb(191, 238, 255); background-color: rgb(255, 235, 205);text-align:center;font-size:1.5em;" | ||
|- valign="center" | |- valign="center" | ||
| [[file: | | [[file:thunderbird_logo.png|link=https://help.computerisms.ca/Thunderbird|75px]] | ||
|| [[file:Outlook.png|link= | || [[file:Outlook.png|link=https://help.computerisms.ca/Outlook|75px]] | ||
|| | || | ||
|- | |- | ||
| [[ | | [[Thunderbird|Thunderbird]] | ||
|| [[ | || [[Outlook|Outlook]] | ||
|| | || | ||
|} | |} | ||
==How to setup your email on | ==How to setup your email on iPhone== | ||
{| style="width:100%" border="0" cellspacing=" | {| style="width:100%" border="0" cellspacing="75" cellpadding="20" style="font-size:120%; | ||
|- | |- | ||
|style="width: 50%"| | |style="width: 50%"| | ||
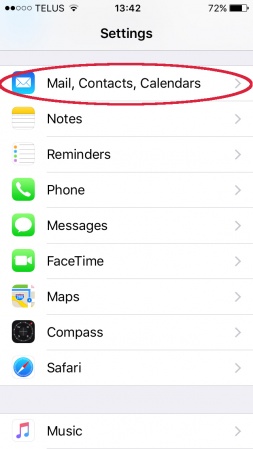
* | *Navigate to your settings and select the Mail, Contacts, Calenders settings | ||
|[[File:Iphoneemail1.JPG|centre|450x450px]] | |||
|[[File: | |||
|- | |- | ||
|[[File: | |[[File:Iphoneemail2.JPG|centre|450x450px]] | ||
| | | | ||
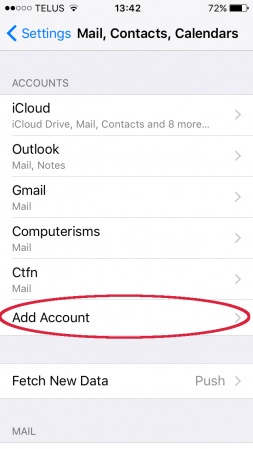
* | *Select Add Account | ||
|- | |- | ||
| | | | ||
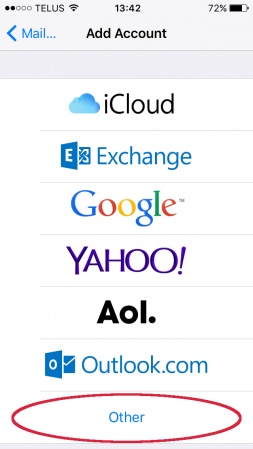
* | *Select "Other" to add a POP3 or IMAP account | ||
|[[File:Iphoneemail3.JPG|centre|450x450px]] | |||
|[[File: | |||
|- | |- | ||
| | |[[File:Iphoneemail4.JPG|centre|450x450px]] | ||
| | |||
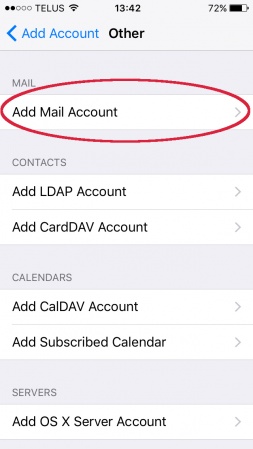
*Choose Add Mail Account | |||
|- | |- | ||
| | | | ||
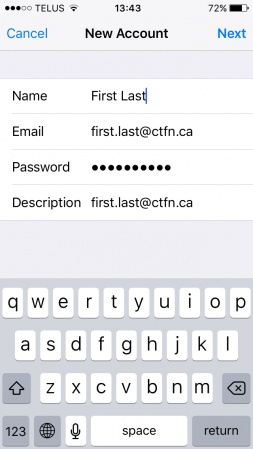
* | *Enter your Name, Email, Password and a Description | ||
*Click Next | *Click Next | ||
|[[File:Iphoneemail5.JPG|centre|450x450px]] | |||
|- | |- | ||
|[[File:Iphoneemail6.JPG|centre|450x450px]] | |||
| | | | ||
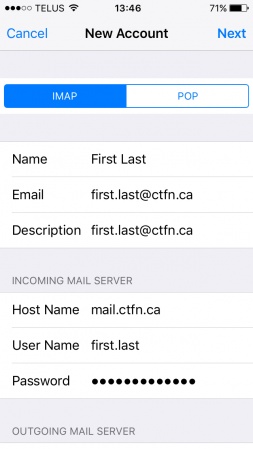
* | *For Incoming mail server | ||
**Host name: mail.domain.tld (for example mail.ctfn.ca) | |||
**User Name is your full email address | |||
**Password is the same password that you are using for email | |||
* | |||
* | |||
** | |||
* | |||
* | |||
|- | |- | ||
| | | | ||
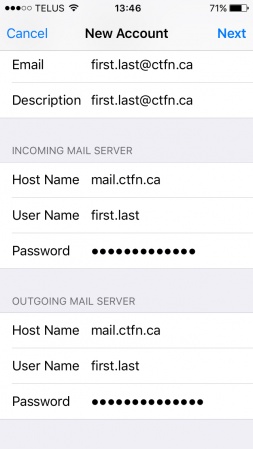
* | *For Outgoing Mail Server: | ||
** | **Host name: mail.domain.tld (for example mail.ctfn.ca) | ||
** | **User Name is your full email address | ||
* | **Password is the same password that you are using for email | ||
*Click Next | *Click Next and your email should be ready | ||
* | *Recommended : send an email to your self to check and make sure all settings are working | ||
|[[File:Iphoneemail7.JPG|centre|450x450px]] | |||
|} | |} | ||
==Email Settings== | ==Email Settings== | ||
*IMAP: configure using SSL (port 993) Server:[[Domain Substitution|mail. | ====Computerisms Hosted Email==== | ||
*POP3: configure using SSL (port 995) Server:[[Domain Substitution|mail. | *IMAP: configure using SSL (port 993) Server: [[Domain Substitution|mail.yourdomain.tld]] | ||
*SMTP: Server:[[Domain Substitution|mail. | *POP3: configure using SSL (port 995) Server: [[Domain Substitution|mail.yourdomain.tld]] | ||
**Port | *SMTP: Server:[[Domain Substitution|mail.yourdomain.tld]] | ||
* | **Port 465: With Authentication using incoming user/pass and SSL/TLS | ||
**Port 465 | ***Our email hosting uses Port 465 and SSL/TLS for SMTP | ||
*Thunderbird Users: our mail servers are set up in a way that Thunderbird should find all this information automatically, all you need to do is enter your Name, Email Address, and Password in the Add Email Account Wizard. | |||
*Outlook Users: Outlook may not be able to find this info automatically, so you may have to key it in manually. | |||
*Thunderbird Users: | |||
*Outlook Users: Outlook | |||
==Server Side Filters== | ==Server Side Filters== | ||
| Line 112: | Line 76: | ||
*There is also a [https://addons.mozilla.org/en-US/thunderbird/addon/sieve/ a Thunderbird Plugin], but it's a bit complicated to use | *There is also a [https://addons.mozilla.org/en-US/thunderbird/addon/sieve/ a Thunderbird Plugin], but it's a bit complicated to use | ||
==Mail Management== | ==Mail Management (For our hosting)== | ||
*[[QmailAdmin Management|Manage your email accounts, passwords, mailing lists, and more]] | *[[QmailAdmin Management|Manage your email accounts, passwords, mailing lists, and more]] | ||
Latest revision as of 16:53, 3 June 2021
Instructions For Configuring Email Clients

|

|
|
| Thunderbird | Outlook |
How to setup your email on iPhone
Email Settings
Computerisms Hosted Email
- IMAP: configure using SSL (port 993) Server: mail.yourdomain.tld
- POP3: configure using SSL (port 995) Server: mail.yourdomain.tld
- SMTP: Server:mail.yourdomain.tld
- Port 465: With Authentication using incoming user/pass and SSL/TLS
- Our email hosting uses Port 465 and SSL/TLS for SMTP
- Port 465: With Authentication using incoming user/pass and SSL/TLS
- Thunderbird Users: our mail servers are set up in a way that Thunderbird should find all this information automatically, all you need to do is enter your Name, Email Address, and Password in the Add Email Account Wizard.
- Outlook Users: Outlook may not be able to find this info automatically, so you may have to key it in manually.
Server Side Filters
Server Side Message Filtering can be used by any program supporting the SIEVE protocol
- NOTE: Computerisms has Server Side Filtering disabled by default, please contact us to enable it
- Enabling this feature will disable the ability to do forwarding and autoreplies in Qmailadmin
- Qmailadmin is easier to use, Server Side Filtering provides more features and control
- The Sieve Protocol is a platform independent method of filtering your mail
- This is commonly done using "Message Rules" or similar on email clients such as Thunderbird and Outlook, but your program needs to download the messages in order to filter them
- In this case, the server does the filtering so it can drop the mail in the correct folder before your email client knows it is there
- Sieve Protocol also allows for other features, such as Out of Office replies, forwarding, and copying.
- Be sure to include rules pertaining to BULK mail if you subscribe to mailing lists and want to use Out of Office replies
- RoundCube can be used to implement Server Side Filters
- SquirrelMail also supports Server Side Filtering, just click on the coffee filter icon after you log in
- There is also a a Thunderbird Plugin, but it's a bit complicated to use
