Shared Address Book: Difference between revisions
Jump to navigation
Jump to search
| (10 intermediate revisions by 2 users not shown) | |||
| Line 9: | Line 9: | ||
==I Just Want an Address Book That All My Devices Will Sync With== | ==I Just Want an Address Book That All My Devices Will Sync With== | ||
{| style="width:100%" border=" | {| style="width:100%" border="0" cellspacing="0" cellpadding="20" style="font-size:120%; | ||
|- | |- | ||
|style="width: 50%"| | |style="width: 50%"| | ||
| Line 38: | Line 38: | ||
==I Need More Address Books== | ==I Need More Address Books== | ||
{| style="width:100%" border=" | {| style="width:100%" border="0" cellspacing="0" cellpadding="20" style="font-size:120%; | ||
|- | |- | ||
|style="width: 50%"| | |style="width: 50%"| | ||
| Line 81: | Line 81: | ||
<b>Before you begin:</b><br> | <b>Before you begin:</b><br> | ||
*Your Assistant must have logged into the server at [[Domain Substitution|https://cal.domain.tld]] at least once. | *Your Assistant must have logged into the server at [[Domain Substitution|https://cal.domain.tld]] at least once. | ||
{| style="width:100%" border="0" cellspacing="0" cellpadding="20" style="font-size:120%; | |||
{| style="width:100%" border=" | |||
|- | |- | ||
|style="width: 50%"| | |style="width: 50%"| | ||
| Line 123: | Line 122: | ||
|- | |- | ||
|} | |} | ||
==I have many users and many address books, How do I use groups to ease management?== | |||
<b>Before you begin:</b><br> | |||
*You must be logged in as an administrative user (Typically that is the email of the person who owns the domain name) | |||
*You may "nest" groups - which means you may make a group a member of another group, and then that group may be a member of another group. | |||
**If nesting groups go through too many layers, it will slow the server down. | |||
**Rather than have me come ask you to redo your groups, please do not add groups that already have a group to a new group. In other words, do not nest more than one deep. | |||
{| style="width:100%" border="0" cellspacing="0" cellpadding="20" style="font-size:120%; | |||
|- | |||
|style="width: 50%"| | |||
*Go to https://cal.domain.tld and accept the Security Certificate warning | |||
*Login with your email address as your User Name and your email password for Password and click Go | |||
|[[File:Help.davical.login.png|center|500px]] | |||
|- | |||
|[[File:Help.davical.nav.create.principal.png|center|500px]] | |||
| | |||
*In the top left corner of the page, put your mouse on User Functions and select Create Principal | |||
|- | |||
| | |||
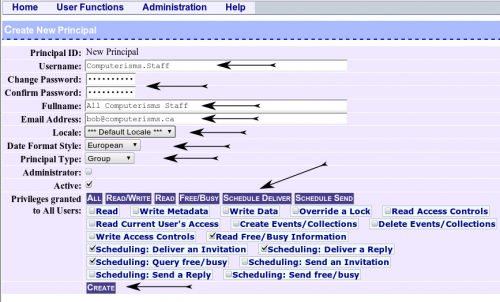
*Choose a Username for this group | |||
**The Username for the group is arbitrary, but should have some meaning to the address book administrator to ease management | |||
*Set the password | |||
**The Username and password for the group can be given to other people to manage, if you like | |||
*Fullname will be the name that is displayed throughout the interface to represent this group | |||
*Email address is the address associated with this group | |||
*Locale - if you do not want standard Canadian English, change this | |||
*Date Format Style: | |||
**European date formate is dd/mm/yyyy | |||
**ISO (international) format is yyyy/mm/dd | |||
**US date format is mm/dd/yyyy | |||
*Set the Principal Type to be group | |||
*Set permissions | |||
**Every user will have these permissions on any address book this group owns. | |||
*When everything is to your satisfaction, click the create button | |||
|[[File:Help.davical.create.group.png|center|500px]] | |||
|- | |||
|[[File:Help.davical.group.add.members.png|center|500px]] | |||
| | |||
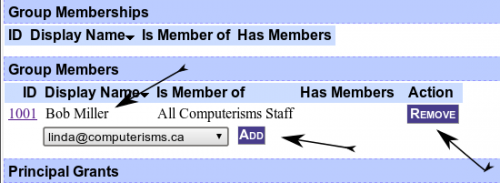
*After you click the create button, you will be brought to a page where you can manage your group | |||
*On this page, you may create a new address book or calendar that will be owned by this group | |||
**Permissions can then be granted to other groups and users on those created calendars | |||
*To add members to the group, scroll down to the Group Members section | |||
**Select a user from the drop down menu and select Add | |||
**Previously Added members will show up just above the drop down menu | |||
**Remove members from the group by pressing the remove button | |||
*Now, [[#I Need My Assistant To Edit My Address Book|when granting permissions to other user]] you may grant a group access to an address book instead of a user | |||
|- | |||
| | |||
*To be safe, always log out when you are finished | |||
**When your assistant adds a new calendar to his/her calendar client, he/she will use the DAV Path you obtained from two rows above and his/her own email address and email password | |||
|[[File:Help.davical.logout.png|center|500px]] | |||
|- | |||
|} | |||
==Clients== | |||
*[[Thunderbird#Shared Address Book|How to set up Shared Address Books in Thunderbird/Lightning]] | |||
*[[Round Cube#Shared Address Book|How to set up Shared Address Books in RoundCube Webmail]] | |||
*[[Android#Shared Address Book|How to set up Shared Address Books in Android]] | |||
Latest revision as of 00:32, 15 November 2016
- Setting up Shared Address Books is a two part process
- First, you must log into the server interface to create the address books and grant permission to other user to access them
- The act of logging in will create a default calendar and address book for that user.
- It is required that a user log in before he can be granted permissions to any address books
- Then you need to configure your CardDAV client to access the address books you created
- There is no web interface for the address books, you must access them through a client such as thunderbird or webmail.
- This interface is a little bit overwhelming at first, but so is the number of things you can do with it
- This page will not show you everything you can do, but it should show you some of the basic functions without making you learn all there is to know.
I Just Want an Address Book That All My Devices Will Sync With
|
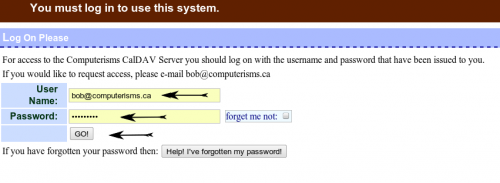 |
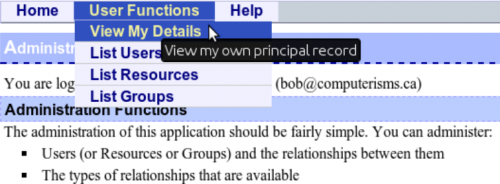 |
*Ignore the contents of this page for now, at the top of the page, put your mouse on UserFunctions and then select "View My Details" |
|
 |
 |
|
|
 |
I Need More Address Books
|
 |
 |
*Ignore the contents of this page for now, at the top of the page, put your mouse on UserFunctions and then select "View My Details" |
|
 |
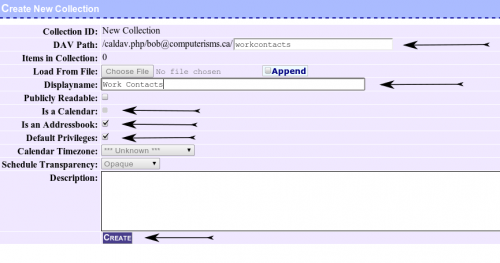 |
|
|
 |
Address Book Permissions
- All address books must be created by a user and therefore owned by a user.
- That user will then grant permissions to other people, identified by their email address or group, to read and/or modify their address books
- The user being granted permission will use his own email address and email password to access your address books
- you may create groups to manage users more easily
I Need My Assistant To Edit My Address Book
Before you begin:
- Your Assistant must have logged into the server at https://cal.domain.tld at least once.
|
 |
 |
*Ignore the contents of this page for now, at the top of the page, put your mouse on UserFunctions and then select "View My Details" |
|
 |
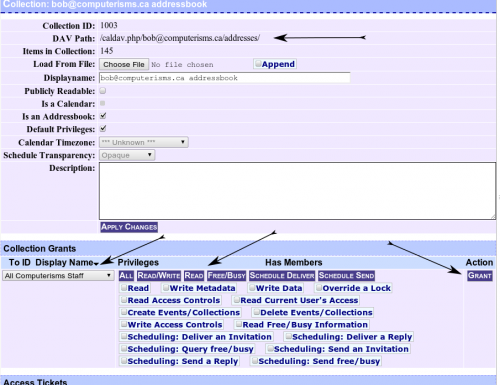 |
|
|
 |
 |
|
I have many users and many address books, How do I use groups to ease management?
Before you begin:
- You must be logged in as an administrative user (Typically that is the email of the person who owns the domain name)
- You may "nest" groups - which means you may make a group a member of another group, and then that group may be a member of another group.
- If nesting groups go through too many layers, it will slow the server down.
- Rather than have me come ask you to redo your groups, please do not add groups that already have a group to a new group. In other words, do not nest more than one deep.
|
 |
 |
|
|
 |
 |
|
|
 |