Shared Address Book: Difference between revisions
Jump to navigation
Jump to search
| Line 69: | Line 69: | ||
*Now, obtain your [[#I Just Want a Calendar That All My Devices Will Sync With|DAV Path]], [[#I Need My Assistant To Edit My Calendar|Grant permission to other users to access or modify your Calendar]] and proceed to [[#Clients|configuring your clients]] | *Now, obtain your [[#I Just Want a Calendar That All My Devices Will Sync With|DAV Path]], [[#I Need My Assistant To Edit My Calendar|Grant permission to other users to access or modify your Calendar]] and proceed to [[#Clients|configuring your clients]] | ||
|[[File:Help.davical.logout.png|center|500px]] | |[[File:Help.davical.logout.png|center|500px]] | ||
|} | |||
==I Need My Assistant To Edit My Calendar== | |||
<b>Before you begin:</b><br> | |||
*Your Assistant must have logged into the server at [[Domain Substitution|https://cal.domain.tld]] at least once. | |||
{| style="width:100%" border="1" cellspacing="0" | |||
|- | |||
|style="width: 50%"| | |||
*Go to [[Domain Substitution|https://cal.domain.tld]] and accept the Security Certificate warning | |||
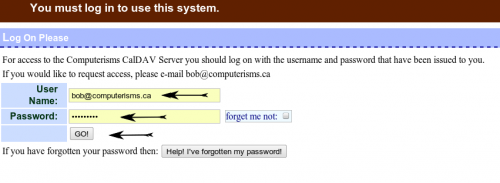
*Login with your email address as your User Name and your email password for Password and click Go | |||
|[[File:Help.davical.login.png|center|500px]] | |||
|- | |||
|[[File:Help.davical.nav.mydetail.png|center|500px]] | |||
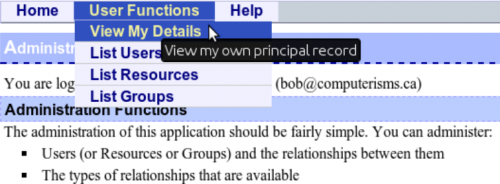
|*Ignore the contents of this page for now, at the top of the page, put your mouse on UserFunctions and then select "View My Details" | |||
|- | |||
| | |||
*Scroll down and find the blue bar labelled Principal Collections | |||
*Identify under Display Name which line corresponds to your calendar (not your address book). | |||
*Click the link in the left most column on the identified line. It will be a four or five digit number. | |||
|[[File:Help.davical.select.principal.png|center|500px]] | |||
|- | |||
|[[File:Help.davical.grant.perms.png|center|500px]] | |||
| | |||
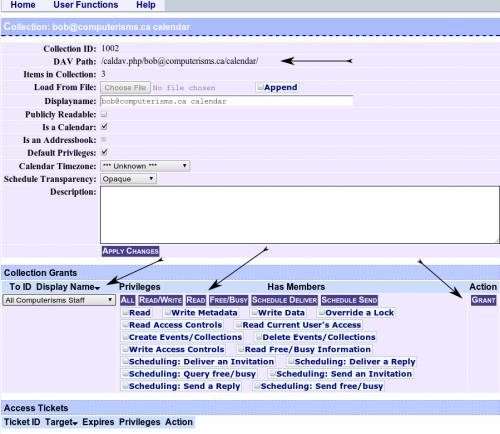
*Note the DAV Path, your assistant will need this information to set up their calendar client | |||
*Under "To ID Display Name" use the drop down menu to select your assistant's email address | |||
*Select the individual permissions to grant to your assistant, or use one of the blue buttons to select a pre-generated subset | |||
**All Permissions will do exactly as it says, grant that user full permission to organize your calendar anyway they see fit | |||
**Read/Write access allows the user to modify your calendar, such as delete events and create new ones. | |||
**Read access will allow the user to view your calendar events, but will not let the user add or delete events | |||
**Free/Busy will allow others to see if you have events on your calendar, but not the contents of those events | |||
**If you know what the other items are, you will know if you need them; else you don't need them. | |||
*Click the Grant button. | |||
|- | |||
| | |||
*After you click the Grant Button, The user will be displayed with a link so you can look at the details of that user | |||
*The privileges that have been granted to this user will be listed | |||
*Use the Edit and Revoke buttons to modify or remove a user's ability to access your calendars respectively | |||
*You may add multiple users and grant each of them a different set of permissions | |||
|[[File:Help.davical.grant.perms.2.png|center|500px]] | |||
|- | |||
|[[File:Help.davical.logout.png|center|500px]] | |||
| | |||
*To be safe, always log out when you are finished | |||
*Your assistant now needs to configure his/her [[#Clients|calendar clients]] | |||
**When your assistant adds a new calendar to his/her calendar client, he/she will use the DAV Path you obtained from two rows above and his/her own email address and email password | |||
|- | |||
|} | |} | ||
Revision as of 17:45, 1 August 2012
- Setting up Shared Address Books is a two part process
- First, you must log into the server interface to create the address books and grant permission to other user to access them
- The act of logging in will create a default calendar and address book for that user.
- It is required that a user log in before he can be granted permissions to any address books
- Then you need to configure your CardDAV client to access the address books you created
- There is no web interface for the address books, you must access them through a client such as thunderbird or webmail.
- This interface is a little bit overwhelming at first, but so is the number of things you can do with it
- This page will not show you everything you can do, but it should show you some of the basic functions without making you learn all there is to know.
I Just Want an Address Book That All My Devices Will Sync With
|
 |
 |
*Ignore the contents of this page for now, at the top of the page, put your mouse on UserFunctions and then select "View My Details" |
|
 |
 |
|
|
 |
I Need More Address Books
|
 |
 |
*Ignore the contents of this page for now, at the top of the page, put your mouse on UserFunctions and then select "View My Details" |
|
 |
 |
|
|
 |
I Need My Assistant To Edit My Calendar
Before you begin:
- Your Assistant must have logged into the server at https://cal.domain.tld at least once.
|
 |
 |
*Ignore the contents of this page for now, at the top of the page, put your mouse on UserFunctions and then select "View My Details" |
|
 |
 |
|
|
 |
 |
|