Fetch: Difference between revisions

From help.computerisms.ca
Jump to navigation Jump to search
 
(15 intermediate revisions by 2 users not shown)
Line 6: Line 6:


==Large File Transfers==
*Many mail servers do not accept mail with large attachments, most will limit the size of allowable mail to between 5 and 10 MB
*Computerisms mail server allows mails up to 10 MB in size
*The Computerisms mail server allows mail with attachments up to ~10 MB in size
*This utility can transfer files up to 2 GB in size, depending on how [[#Configuring the Plugins|the plugins]] are configured
*This utility can transfer files up to 2 GB in size
*This utility is straightforward and easy to use
*This utility employs a number of features to encrypt connection and prevent unwanted people and bots from accessing your data
*This utility uses its own username/password database, which means your email username and password are not necessarily the same as they are here.
*This utility uses its own username/password database, which means your email username and password are not necessarily the same as they are for Fetch.


==Setting up Users on the Computerisms Large File Transfer Utility==
==Setting up Users on the Computerisms Hosted Fetch Utility==
{| style="width:100%" border="1" cellspacing="0"
{| style="width:100%" border="0" cellspacing="0" cellpadding="20" style="font-size:120%;
|-
|-
|style="width: 50%"|
|style="width: 50%"|
*Go to [[Domain Substitution|https://fetch.domain.tld]] and accept the [[Security Certificates|Security Certificate]]
*Go to [[Domain Substitution|https://fetch.domain.tld]]
*Enter the Administrative Email address as User name, the associated email password, and click Login
**The Administrative Email address and its password will be supplied to you when we contact you to let you know your domain is set up
Line 24: Line 24:
|[[File:Help.fetch.first.menu.png|center|500px]]
|[[File:Help.fetch.first.menu.png|center|500px]]
|
|
*In the next window, click the Administration link
*From the dashboard, on the sidebar click System Users, then Add new
|-
|-
|
|
*Select the Users icon
*Set the display name for the user <b>(this is different from the name they will use to login!)</b>
|[[File:Help.fetch.admin.menu.png|center|500px]]
**A suggestion would be to make this the user's full name, or something that you will recognize the user by for later management.
|-
*Set the log in username
|[[File:Help.fetch.add.user.1.png|center|500px]]
**Note this does not have to be in the format of an email address, you are free to set anything you want
|
**The advantage to using an email address as a login name is your users will not have to remember a different login name for this service
*Click the Add User icon
|-
|
*Set the login name
**Note this does not have to be in the format of an email address
**The advantage to using an email address as a login name is your users will not have to remember a different login name for this service.
*Set the Password
*Set the Password
**You can set the password to be the same as the user's email password, but updating the email password will not update this password
*Enter the user's Full Name
**You can also hit Generate to create a very secure jumble of letters for the password, but this may be hard to remember for the user
*Enter the user's Email Address
*Set the Group for this user:
*Set the Role for this user:
**Administrator's Group will allow this user to add new users and modify the system
**System Administrator will allow this user to add new users and modify them, and modify the system
**Registered Users Group will allow the user to log in and upload files to be delivered to other users
**Account Manager will allow this user to add new users and modify them, but not modify system settings
**Uploader will allow the user to log in and upload files to be delivered to other users
***This group is where you should put your staff
**Unregistered Users are not allowed to send files, only receive them
*Max upload filesize is for if you wish to limit the size of files this user can upload. This is not global, it only affects the user you are creating
***A recipient does not have to be registered in order to download files sent to him
**Set it to 0 to automatically set the max size to the server-wide default
***This group is largely unused, but would be where you would normally put users external to your organization
*Ensure the Active checkbox is selected, otherwise the user will be unable to login
*If the user's preferred language is not English, set it here
*Check Send welcome email if you'd like to have the user be sent their new account login credentials via email. If this is not selected, the user will be created but you will have to provide the username and password to them via a different method
*Ensure the Active setting is selected, and press the Add button
*Rinse and Repeat for every user on your network that will need to send large files
|[[File:Help.fetch.add.user.2.png|center|500px]]
|[[File:Help.fetch.add.user.2.png|center|500px]]
Line 56: Line 50:


==Transferring Large Files==
{| style="width:100%" border="1" cellspacing="0"
{| style="width:100%" border="0" cellspacing="0" cellpadding="20" style="font-size:120%;
|-
|-
|style="width: 50%"|
|style="width: 50%"|
*Go to [[Domain Substitution|https://fetch.domain.tld]] and accept the [[Security Certificates|Security Certificate]]
*Go to [[Domain Substitution|https://fetch.domain.tld]]
*Enter the credentials provided to you for this utility, and click Login
|[[File:Help.fetch.login.png|center|500px]]
|[[File:Help.fetch.login.png|center|500px]]
Line 65: Line 59:
|[[File:Help.fetch.file.upload.png|center|500px]]
|[[File:Help.fetch.file.upload.png|center|500px]]
|
|
*Click the Choose File button and navigate to the file you want to send, then click ok
*From the dashboard, go to the sidebar, and click on Files, then Upload
**Depending on if and how [[#Configuring the Plugins|the plugins]] are configured, you may be able to send more than one file at a time
*The maximum file upload size and other details are listed for your convenience
*When you have selected all files you want to send, click the Upload button
|-
|
*After clicking the Upload button, your browser should show you some kind of upload progress indicator
**Different browsers may display this differently
|[[File:Help.fetch.upload.progress.png|center|500px]]
|-
|[[File:Help.fetch.upload.details.png|center\500px]]
|
*When the file has been uploaded, the server will ask you some questions about the file
*OPTIONAL: Description is useful if there are several files waiting to be delivered
*OPTIONAL: Use Captcha will make it so the recipient will have to read letters and numbers from a picture and enter them in order to retrieve the file
**This may cause some inconvenience to your recipient, but is a security measure against hacking scripts and other exploits
*OPTIONAL: Send me an email - select this to receive a copy of the mail sent to the recipient
**This option provides proof that mail was successfully sent from the server
*Email Subject: the subject for the email notification the recipient will get
*Email Message: the body of the email notification the recipient will get
*OPTIONAL: Password protect will require the user to enter a password to download the file
**This provides an additional layer of security to Use Captcha, but instead of keeping out scripts and programs, it keeps out humans
*OPTIONAL: Send password in e-mail will send the password you set in the notification email. 
**This may not be appropriate, for example when sending to an email address that more than one person may be checking
**If you wish to set a password, but not send it in the email, then set the password and phone the recipient to tell him what it is
*When you have filled in all the details, click the Complete Upload button
|-
|
*The next page will display the download link and the removal link so you can test and/or remove your file
|[[File:Help.fetch.upload.final.png|center|500px]]
|-
|}
 
==Configuring the Plugins==
{| style="width:100%" border="1" cellspacing="0"
|-
|style="width: 50%"|
*Go to [[Domain Substitution|https://fetch.domain.tld]] and accept the [[Security Certificates|Security Certificate]]
*Enter the Administrative Email address as User name, the associated email password, and click Login
**The Administrative Email address and its password will be supplied to you when we contact you to let you know your domain is set up
|[[File:Help.fetch.login.png|center|500px]]
|-
|-
|[[File:Help.fetch.first.menu.png|center|500px]]
|
*In the next window, click the Administration link
|-
|
*Select the Plugins Icon
|[[File:Help.fetch.plugins.1.png|center|500px]]
|-
|-
|[[File:Help.fetch.plugins.2.png|center|500px]]
|
|
*ACL stands for Access Control List - this icon will lead you to where you can enable and disable plugins for each of the three groups
*Once on this page, you may drag and drop files into the box or press Add files to select them manually
*Plugins Options - this icon will lead you to where you can change settings on the various plugins
*You are allowed to upload multiple files at a time, just drag/select as many as you want to upload
*Once you've selected all the files you wish to upload, hit upload files. You will see the upload progress go up for each file as they upload
|[[File:Help.fetch.upload.progress.png|center|800px]]
|-
|-
|[[File:Help.fetch.upload.details.png|center|800px]]
|
|
*Click on the link along the left hand side to configure each plugin
*When the file(s) have been uploaded, the server will ask you some questions about them
**Captcha - This plugin allows use of a [http://en.wikipedia.org/wiki/CAPTCHA captcha], which helps prevent unauthorized access from automated internet bots
**Title allows you to change the name of the file as shown in Fetch to you and the people you send the files to
***Configuration Options: None
**Description allows you to add a description to the file, which will be shown to you and the people you send that file to
**Compression - not enabled at this time
**Expiration date allows you to set a date on which the file will be deleted (if wishing to use this feature, make sure to tick the File expires checkbox, otherwise the date you set will do nothing)
**email - This plugin takes care of emailing notifications that a file is waiting to be picked up
**Allow public downloading of this file is to allow the file to be accessed by people who do not have an account on your Fetch. You likely want to tick this box, unless you are sending information between users at your company/non-profit/group of people
***Configuration Options: allow multiple recipients to be notified a file is available for pickup for each group
**Assignations allow you to select people on which to allow access to the files. This is what you'd want to use if you were sending a large file within your company/non-profit/group of people. You can also use assignations to allow access to an entire group of users, if so desired
**expire - this plugin is used to limit the number of days a file can be accessed after it is uploaded
***If you're allowing public downloading there's no real benefit to assigning it to a user, you can leave this blank
***Configuration Options: the number of days
**Categories allows you to categorize your file into categories made by the administrator of your Fetch instance
**filesize - this plugin will let you limit the maximum allowable file size
***Configuration Options: maximum file size per group
**grouponip - this plugin puts the user in the administrators, registered users, or unregistered users groups according to the IP address the connection is coming from
***Configuration Options: IP addresses
**mimetypes - this plugin is for limiting what kinds of files users can upload
***Configuration Options: MIME types
**password - this  plugin allows the sender to require a password for the recipient to be able to download it, which prevent unauthorized humans from accessing the document
***Configuration Options: None
|[[File:Help.fetch.plugins.list.png|center|500px]]
|-
|-
|[[File:Help.fetch.plugins.acl.1.png|center|500px]]
|
|
*ACLs are used to enable or disable plugins for each of the three groups
*The next page will display the information you set on the previous screen, along with a download link (if you made the file available for public download)
*Plugins are disabled by default and must be explicitly enabled for each group in order to work
**To get the link to send to other people, click on the Public button, and a window should pop-up with the link to copy
*To add more plugins, click the Plugins ACL link
|[[File:Help.fetch.upload.final.png|center|800px]]
|-
|-
|-
|
*Select the plugin you wish to enable
*Select the group you wish to enable it for
*Select enable
*click the add button
|[[File:Help.fetch.plugins.acl.2.png|center|500px]]
|}
|}

Latest revision as of 19:43, 1 January 2021


Accessing the Service

  • You can reach this service by pre-pending fetch to your domain name and entering it in the address bar of your browser

Large File Transfers

  • Many mail servers do not accept mail with large attachments, most will limit the size of allowable mail to between 5 and 10 MB
  • The Computerisms mail server allows mail with attachments up to ~10 MB in size
  • This utility can transfer files up to 2 GB in size
  • This utility is straightforward and easy to use
  • This utility employs a number of features to encrypt connection and prevent unwanted people and bots from accessing your data
  • This utility uses its own username/password database, which means your email username and password are not necessarily the same as they are for Fetch.

Setting up Users on the Computerisms Hosted Fetch Utility

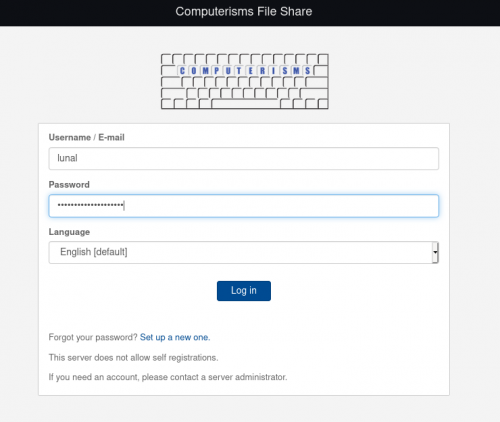
  • Go to https://fetch.domain.tld
  • Enter the Administrative Email address as User name, the associated email password, and click Login
    • The Administrative Email address and its password will be supplied to you when we contact you to let you know your domain is set up
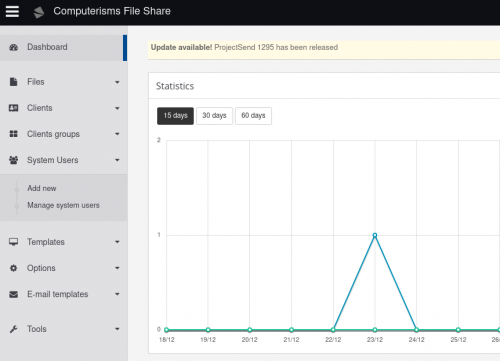
  • From the dashboard, on the sidebar click System Users, then Add new
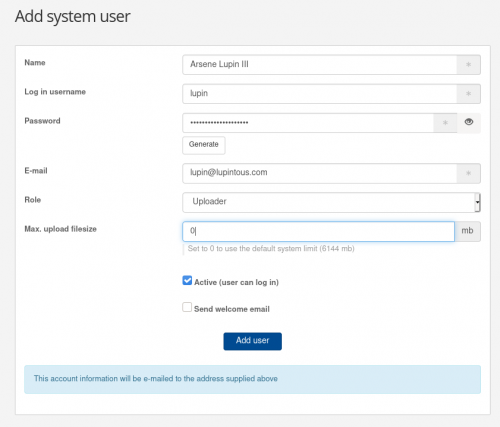
  • Set the display name for the user (this is different from the name they will use to login!)
    • A suggestion would be to make this the user's full name, or something that you will recognize the user by for later management.
  • Set the log in username
    • Note this does not have to be in the format of an email address, you are free to set anything you want
    • The advantage to using an email address as a login name is your users will not have to remember a different login name for this service
  • Set the Password
    • You can set the password to be the same as the user's email password, but updating the email password will not update this password
    • You can also hit Generate to create a very secure jumble of letters for the password, but this may be hard to remember for the user
  • Enter the user's Email Address
  • Set the Role for this user:
    • System Administrator will allow this user to add new users and modify them, and modify the system
    • Account Manager will allow this user to add new users and modify them, but not modify system settings
    • Uploader will allow the user to log in and upload files to be delivered to other users
      • This group is where you should put your staff
  • Max upload filesize is for if you wish to limit the size of files this user can upload. This is not global, it only affects the user you are creating
    • Set it to 0 to automatically set the max size to the server-wide default
  • Ensure the Active checkbox is selected, otherwise the user will be unable to login
  • Check Send welcome email if you'd like to have the user be sent their new account login credentials via email. If this is not selected, the user will be created but you will have to provide the username and password to them via a different method
  • Rinse and Repeat for every user on your network that will need to send large files

Transferring Large Files

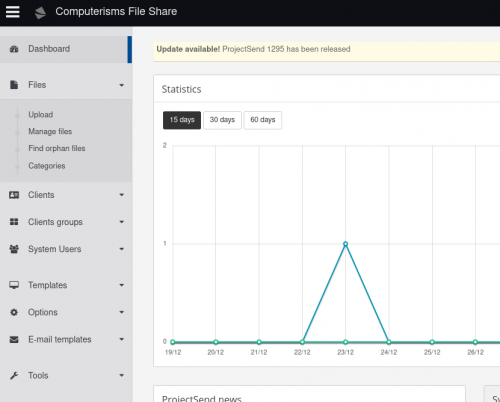
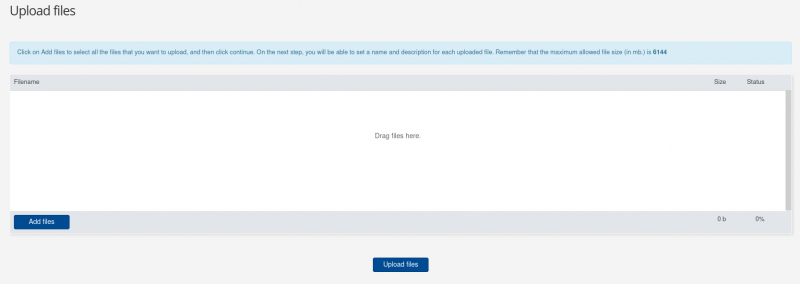
  • From the dashboard, go to the sidebar, and click on Files, then Upload
  • Once on this page, you may drag and drop files into the box or press Add files to select them manually
  • You are allowed to upload multiple files at a time, just drag/select as many as you want to upload
  • Once you've selected all the files you wish to upload, hit upload files. You will see the upload progress go up for each file as they upload
  • When the file(s) have been uploaded, the server will ask you some questions about them
    • Title allows you to change the name of the file as shown in Fetch to you and the people you send the files to
    • Description allows you to add a description to the file, which will be shown to you and the people you send that file to
    • Expiration date allows you to set a date on which the file will be deleted (if wishing to use this feature, make sure to tick the File expires checkbox, otherwise the date you set will do nothing)
    • Allow public downloading of this file is to allow the file to be accessed by people who do not have an account on your Fetch. You likely want to tick this box, unless you are sending information between users at your company/non-profit/group of people
    • Assignations allow you to select people on which to allow access to the files. This is what you'd want to use if you were sending a large file within your company/non-profit/group of people. You can also use assignations to allow access to an entire group of users, if so desired
      • If you're allowing public downloading there's no real benefit to assigning it to a user, you can leave this blank
    • Categories allows you to categorize your file into categories made by the administrator of your Fetch instance
  • The next page will display the information you set on the previous screen, along with a download link (if you made the file available for public download)
    • To get the link to send to other people, click on the Public button, and a window should pop-up with the link to copy