Fetch: Difference between revisions
Jump to navigation
Jump to search
| (60 intermediate revisions by 3 users not shown) | |||
| Line 1: | Line 1: | ||
==Setting up the Computerisms | |||
{| style="width:100%" border=" | ==Accessing the Service== | ||
*You can reach this service by pre-pending fetch to your domain name and entering it in the address bar of your browser | |||
**By example: [[Domain Substitution|fetch.domain.tld]] | |||
==Large File Transfers== | |||
*Many mail servers do not accept mail with large attachments, most will limit the size of allowable mail to between 5 and 10 MB | |||
*The Computerisms mail server allows mail with attachments up to ~10 MB in size | |||
*This utility can transfer files up to 2 GB in size | |||
*This utility is straightforward and easy to use | |||
*This utility employs a number of features to encrypt connection and prevent unwanted people and bots from accessing your data | |||
*This utility uses its own username/password database, which means your email username and password are not necessarily the same as they are for Fetch. | |||
==Setting up Users on the Computerisms Hosted Fetch Utility== | |||
{| style="width:100%" border="0" cellspacing="0" cellpadding="20" style="font-size:120%; | |||
|- | |||
|style="width: 50%"| | |||
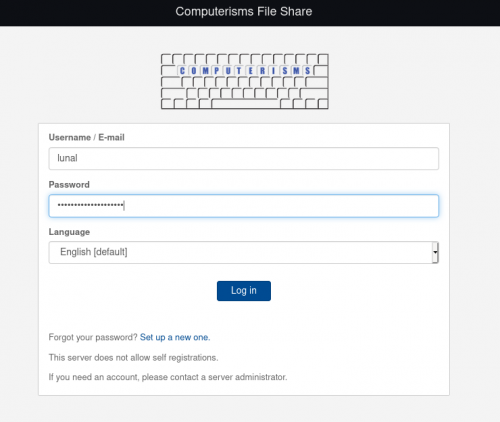
*Go to [[Domain Substitution|https://fetch.domain.tld]] | |||
*Enter the Administrative Email address as User name, the associated email password, and click Login | |||
**The Administrative Email address and its password will be supplied to you when we contact you to let you know your domain is set up | |||
|[[File:Help.fetch.login.png|center|500px]] | |||
|- | |||
|[[File:Help.fetch.first.menu.png|center|500px]] | |||
| | |||
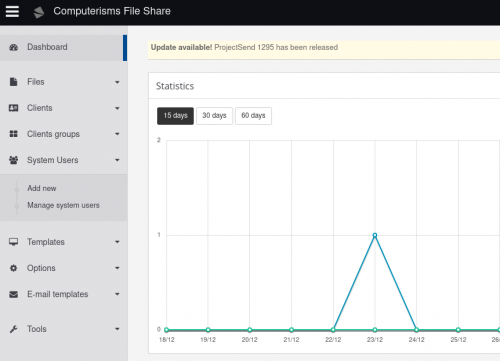
*From the dashboard, on the sidebar click System Users, then Add new | |||
|- | |||
| | |||
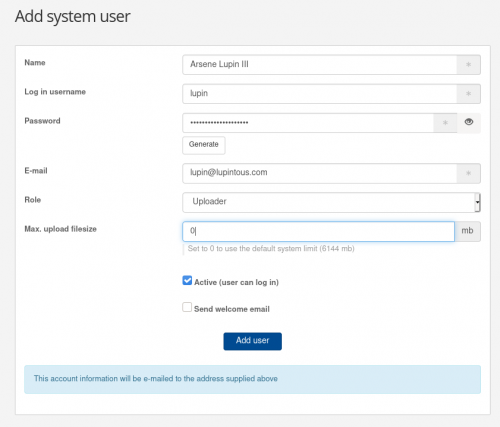
*Set the display name for the user <b>(this is different from the name they will use to login!)</b> | |||
**A suggestion would be to make this the user's full name, or something that you will recognize the user by for later management. | |||
*Set the log in username | |||
**Note this does not have to be in the format of an email address, you are free to set anything you want | |||
**The advantage to using an email address as a login name is your users will not have to remember a different login name for this service | |||
*Set the Password | |||
**You can set the password to be the same as the user's email password, but updating the email password will not update this password | |||
**You can also hit Generate to create a very secure jumble of letters for the password, but this may be hard to remember for the user | |||
*Enter the user's Email Address | |||
*Set the Role for this user: | |||
**System Administrator will allow this user to add new users and modify them, and modify the system | |||
**Account Manager will allow this user to add new users and modify them, but not modify system settings | |||
**Uploader will allow the user to log in and upload files to be delivered to other users | |||
***This group is where you should put your staff | |||
*Max upload filesize is for if you wish to limit the size of files this user can upload. This is not global, it only affects the user you are creating | |||
**Set it to 0 to automatically set the max size to the server-wide default | |||
*Ensure the Active checkbox is selected, otherwise the user will be unable to login | |||
*Check Send welcome email if you'd like to have the user be sent their new account login credentials via email. If this is not selected, the user will be created but you will have to provide the username and password to them via a different method | |||
*Rinse and Repeat for every user on your network that will need to send large files | |||
|[[File:Help.fetch.add.user.2.png|center|500px]] | |||
|} | |||
==Transferring Large Files== | |||
{| style="width:100%" border="0" cellspacing="0" cellpadding="20" style="font-size:120%; | |||
|- | |||
|style="width: 50%"| | |||
*Go to [[Domain Substitution|https://fetch.domain.tld]] | |||
*Enter the credentials provided to you for this utility, and click Login | |||
|[[File:Help.fetch.login.png|center|500px]] | |||
|- | |||
|[[File:Help.fetch.file.upload.png|center|500px]] | |||
| | |||
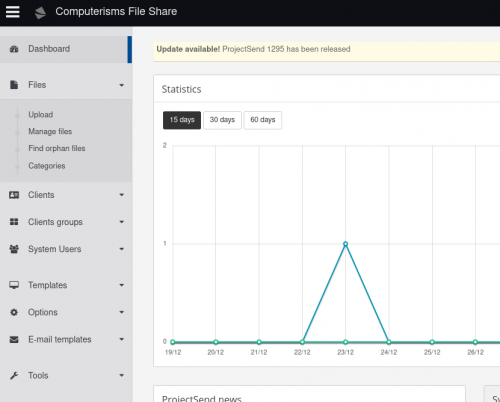
*From the dashboard, go to the sidebar, and click on Files, then Upload | |||
|- | |||
| | |||
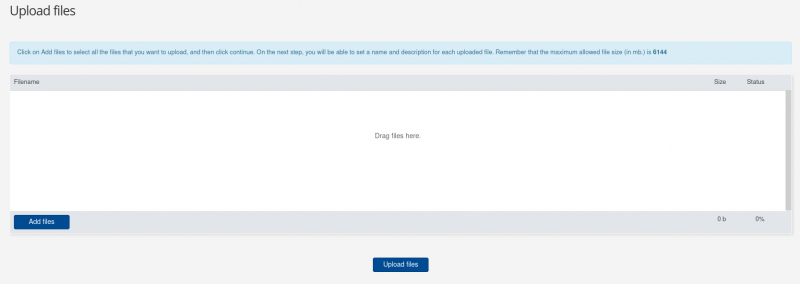
*Once on this page, you may drag and drop files into the box or press Add files to select them manually | |||
*You are allowed to upload multiple files at a time, just drag/select as many as you want to upload | |||
*Once you've selected all the files you wish to upload, hit upload files. You will see the upload progress go up for each file as they upload | |||
|[[File:Help.fetch.upload.progress.png|center|800px]] | |||
|- | |||
|[[File:Help.fetch.upload.details.png|center|800px]] | |||
| | |||
*When the file(s) have been uploaded, the server will ask you some questions about them | |||
**Title allows you to change the name of the file as shown in Fetch to you and the people you send the files to | |||
**Description allows you to add a description to the file, which will be shown to you and the people you send that file to | |||
**Expiration date allows you to set a date on which the file will be deleted (if wishing to use this feature, make sure to tick the File expires checkbox, otherwise the date you set will do nothing) | |||
**Allow public downloading of this file is to allow the file to be accessed by people who do not have an account on your Fetch. You likely want to tick this box, unless you are sending information between users at your company/non-profit/group of people | |||
**Assignations allow you to select people on which to allow access to the files. This is what you'd want to use if you were sending a large file within your company/non-profit/group of people. You can also use assignations to allow access to an entire group of users, if so desired | |||
***If you're allowing public downloading there's no real benefit to assigning it to a user, you can leave this blank | |||
**Categories allows you to categorize your file into categories made by the administrator of your Fetch instance | |||
|- | |- | ||
| | |||
* | *The next page will display the information you set on the previous screen, along with a download link (if you made the file available for public download) | ||
** | **To get the link to send to other people, click on the Public button, and a window should pop-up with the link to copy | ||
|[[ | |[[File:Help.fetch.upload.final.png|center|800px]] | ||
|- | |- | ||
|} | |} | ||
Latest revision as of 00:43, 2 January 2021
Accessing the Service
- You can reach this service by pre-pending fetch to your domain name and entering it in the address bar of your browser
- By example: fetch.domain.tld
Large File Transfers
- Many mail servers do not accept mail with large attachments, most will limit the size of allowable mail to between 5 and 10 MB
- The Computerisms mail server allows mail with attachments up to ~10 MB in size
- This utility can transfer files up to 2 GB in size
- This utility is straightforward and easy to use
- This utility employs a number of features to encrypt connection and prevent unwanted people and bots from accessing your data
- This utility uses its own username/password database, which means your email username and password are not necessarily the same as they are for Fetch.
Setting up Users on the Computerisms Hosted Fetch Utility
|
 |
 |
|
|
 |
Transferring Large Files
|
 |
 |
|
|
 |
 |
|
|
 |