Files: Difference between revisions
Jump to navigation
Jump to search
| (8 intermediate revisions by one other user not shown) | |||
| Line 1: | Line 1: | ||
==Setting up File Storage on Windows | ==How it Works== | ||
*Computerisms Online File Storage is a method of storing files on the Web Server so they can be accessed from multiple locations | |||
**When configured correctly, the storage area can be used as a drive letter on your windows computer or it is mounted in your file system if you use linux or a mac. | |||
**The storage area can also be accessed via a browser at [[Domain Substitution|https://files.domain.tld]] | |||
**Your email address and password are required to access the files by either method | |||
*This service is using the WebDAV protocol; you should be able to use any client that supports WebDAV | |||
*This service would be useful for an organization that needs the functionality of a fully accessible file server outside the office. | |||
==What are the limits== | |||
*Each Hosting Customer is assigned a user account with a quota | |||
*Initial Quota value is to send a warning email when storage exceeds 10 GB, and deny storage that will exceed 12 GB | |||
**This value includes all content from all services under your user account, including your Web Site and any files being stored by the [[Fetch]] service | |||
***If you access your FTP account, the contents of all folders you see will be counted towards your quota | |||
*If you require extra space, we have some flexibility to work with you, please [mailto:bob@computerisms.ca contact us] to discuss options | |||
==A word about Security== | |||
*There is only one storage area | |||
**The storage area can be accessed by anybody with an email address in your organization | |||
*You may make any number of folders in the storage area | |||
**You may not deny access of any folder to any users, there is no permissions scheme. | |||
==Setting up File Storage on Windows 10== | |||
*<b>Before you begin:</b> | *<b>Before you begin:</b> | ||
**You will also need to [[Security Certificates#Internet Explorer - Importing Certificate Authority|install the Computerisms Certificate Authority through Internet Explorer]] | |||
**You will also need to [[Security Certificates#Internet Explorer - Importing Certificate Authority|install the Computerisms Certificate Authority]] | {| style="width:100%" border="0" cellspacing="0" cellpadding="20" style="font-size:120%; | ||
{| style="width:100%" border=" | |||
|- | |- | ||
|style="width: 50%"| | |style="width: 50%"| | ||
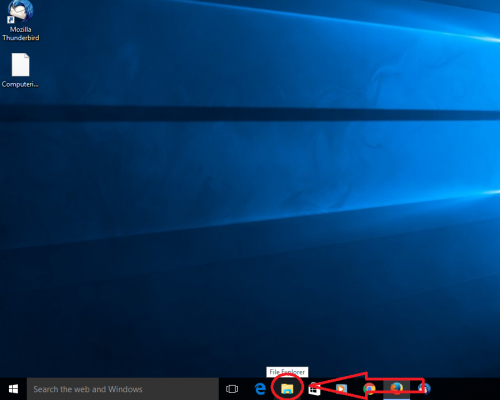
*Open | *Open your file explorer | ||
|[[File:Ofsstep1.png|center|500px]] | |||
|[[File: | |||
|- | |- | ||
|[[File: | |[[File:Ofsstep2.png|center|500px]] | ||
| | | | ||
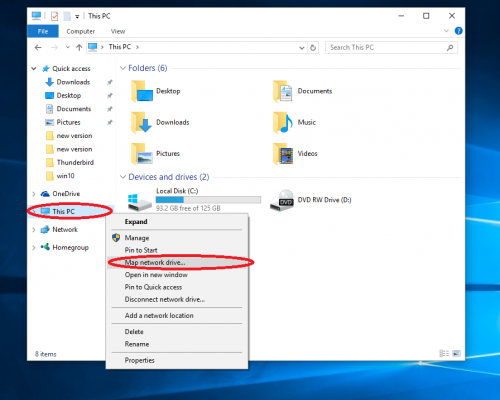
* | *Right click on "This PC" | ||
* | *Choose "Map Network Drive..." | ||
|- | |- | ||
| | | | ||
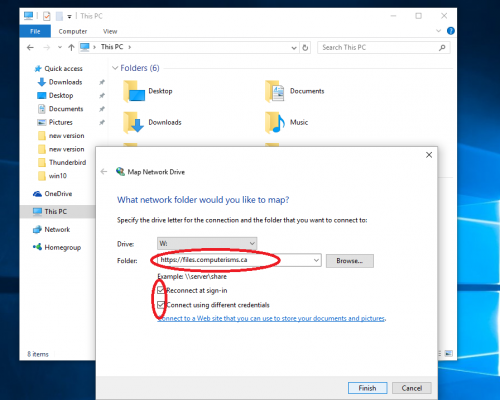
* | *Select a Drive letter (I have chosen W for Web) | ||
* | *The folder field will look like this [[Domain Substitution|https://files.domain.tld]] | ||
* | *Be sure to select Reconnect at logon | ||
|[[File: | *Also be sure to select Connect using different credentials | ||
*When everything is entered, click the finish button | |||
|[[File:Ofsstep3.png|center|500px]] | |||
|- | |||
|[[File:Ofsstep4.png|center|500px]] | |||
| | |||
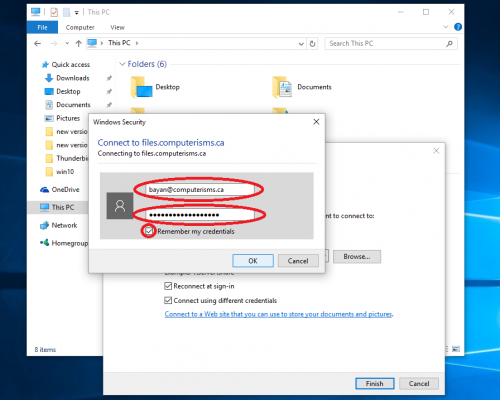
*Enter your email address | |||
*Enter your email password | |||
*Select Remember my credentials | |||
*Click OK | |||
*you will now note a new drive available to store documents on | |||
*Any files you put on this drive will be accessible via the website for anyone with valid credentials | |||
|- | |- | ||
|} | |} | ||
Latest revision as of 18:32, 8 August 2016
How it Works
- Computerisms Online File Storage is a method of storing files on the Web Server so they can be accessed from multiple locations
- When configured correctly, the storage area can be used as a drive letter on your windows computer or it is mounted in your file system if you use linux or a mac.
- The storage area can also be accessed via a browser at https://files.domain.tld
- Your email address and password are required to access the files by either method
- This service is using the WebDAV protocol; you should be able to use any client that supports WebDAV
- This service would be useful for an organization that needs the functionality of a fully accessible file server outside the office.
What are the limits
- Each Hosting Customer is assigned a user account with a quota
- Initial Quota value is to send a warning email when storage exceeds 10 GB, and deny storage that will exceed 12 GB
- This value includes all content from all services under your user account, including your Web Site and any files being stored by the Fetch service
- If you access your FTP account, the contents of all folders you see will be counted towards your quota
- This value includes all content from all services under your user account, including your Web Site and any files being stored by the Fetch service
- If you require extra space, we have some flexibility to work with you, please contact us to discuss options
A word about Security
- There is only one storage area
- The storage area can be accessed by anybody with an email address in your organization
- You may make any number of folders in the storage area
- You may not deny access of any folder to any users, there is no permissions scheme.
Setting up File Storage on Windows 10
- Before you begin:
- You will also need to install the Computerisms Certificate Authority through Internet Explorer
|
 |
 |
|
|
 |
 |
|