Thunderbird: Difference between revisions

From help.computerisms.ca
Jump to navigation Jump to search
Line 49: Line 49:
|-
|-
|style="width: 50%"|
|style="width: 50%"|
*Open your Thunderbird email client and click the file button in the top left hand corner
*Open your Thunderbird email client and click the Hamburger Menu icon next to the search bar (three lines stacked on top of one another)
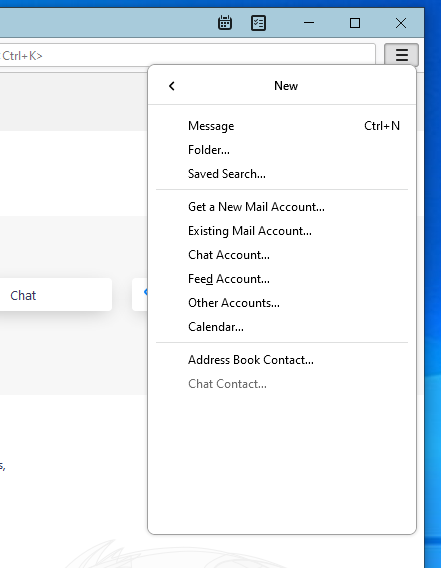
*Select New, and then select Calendar
*Select <code>New</code>, and then select <code>Calendar...</code>
|[[File:Help.tbird.cal.new.cal.1.png|center|500px]]
|[[File:Help.tbird.cal.new.cal.1.png|center|500px]]
|-
|-
Line 58: Line 58:
|-
|-
|
|
*In the next window, ensure under format that Caldav is selected
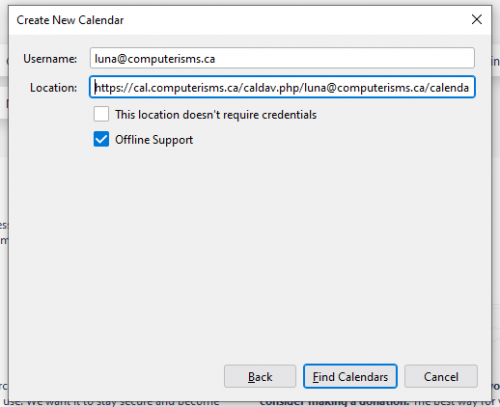
*Enter in your email address in the Username box
*The value you need to enter for Location consists of two parts
*The value you need to enter for Location consists of two parts:
**The first part is based on your domain name in the format [[Domain Substitution|https://cal.domain.tld]]
**The second part is your DAV Path as derived from configuring your [[Calendar]]
**If you are connecting to someone else's calendar, you will need to use the [[Calendar#I Need My Assistant To Edit My Calendar|DAV Path]] they provide you
**The full value will look like this: [[Domain Substitution|https://cal.domain.tld/caldav.php/bob@computerisms.ca/calendar]]
*Put a check mark beside Cache if you want to be able to read your calendars when you are not connected to the internet
*Put a check mark beside <code>Offline Support</code> if you want to be able to read this calendar when you are not connected to the internet
**Note that you will not be able to edit a calendar unless you are connected to the internet
*Click on Find Calendars and let it search
|[[File:Help.tbird.cal.new.cal.3.png|center|500px]]
|[[File:Help.tbird.cal.new.cal.3.png|center|500px]]
|-
|-
|[[File:Help.tbird.cal.new.cal.4.png|center|500px]]
|[[File:Help.tbird.cal.new.cal.4.png|center|500px]]
|
|
*At this point, Thunderbird will want you to name your calendar
*At this point, Thunderbird will want you to type your password to access the calendar
**The name is arbitrary, it can be anything that is meaningful to you. Thunderbird does not care what you name it, only that you name it.
**This is the same password as you use to log into your email account
*Choose a different colour if you wish, and deselect "Show Reminders" if you don't want them
*Select <code>USe Password Manager to remember this password.</code> to allow Thunderbird to save the password for later use (so it doesn't have to prompt you every time the calendar syncs)
*Select the address that will be associated with this calendar
|-
|-
|
|
*If Thunderbird pops up a warning box regarding the Security Certificate, click the "Confirm Security Exception" button
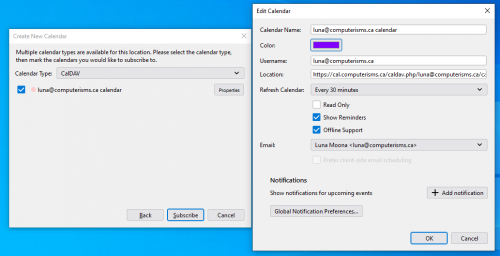
*Thunderbird should have detected your Calendar and be asking for Calendar Type; You want to select CalDAV for use with our calendar system
**See [[Security Certificates]] for more information
*If you wish to change anything about the calendar in Thunderbird itself (Name, Colour, Reminder Support, Read Only, etc) click on <code>Properties</code> next to the calendar and edit to your hearts content
|[[File:Help.tbird.cal.new.cal.5.png|center|500px]]
|[[File:Help.tbird.cal.new.cal.5.png|center|500px]]
|-
|-
|[[File:Help.tbird.cal.new.cal.6.png|center|500px]]
|[[File:Help.tbird.cal.new.cal.6.png|center|500px]]
|
|
*For User Name, enter your full email address
*Once done, click on <code>Subscribe</code>! Congrats, your calendar has been added to Thunderbird
*For Password, enter your email password
**If you are connecting to someone else's calendar, you should still use your own email address and email password
**If your Username and Password are rejected, ensure [[Calendar#I Need My Assistant To Edit My Calendar|you have been granted permission to use that calendar]]
*Select Remember password to avoid having to enter it every time Thunderbird checks for new calendar events
**Note: if multiple people have physical access to your computer, not checking this prevent others from modifying your calendar
|-
|
*Click the Finish button
|[[File:Help.tbird.cal.new.cal.7.png|center|500px]]
|-
|[[File:Help.tbird.cal.new.cal.8.png|center|500px]]
|
*You can now access your calendar
|-
|-
|}
|}

Revision as of 18:05, 18 August 2021

Video Instructions

Email Calendar Address Book

How to Setup your Computerisms Hosted Email on Thunderbird

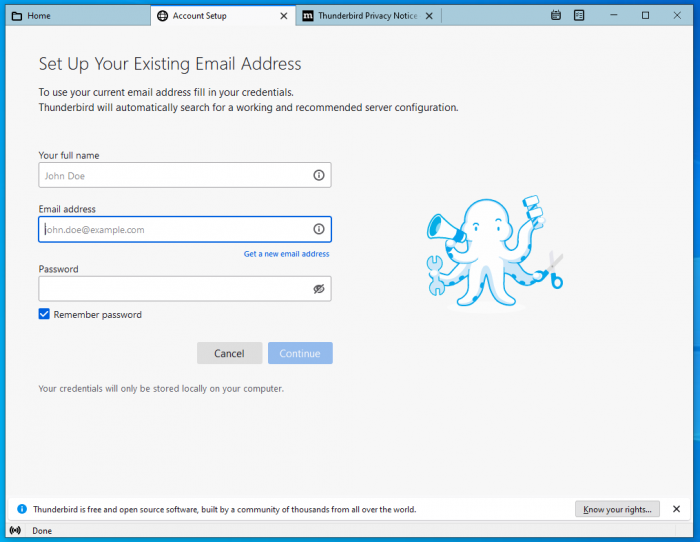
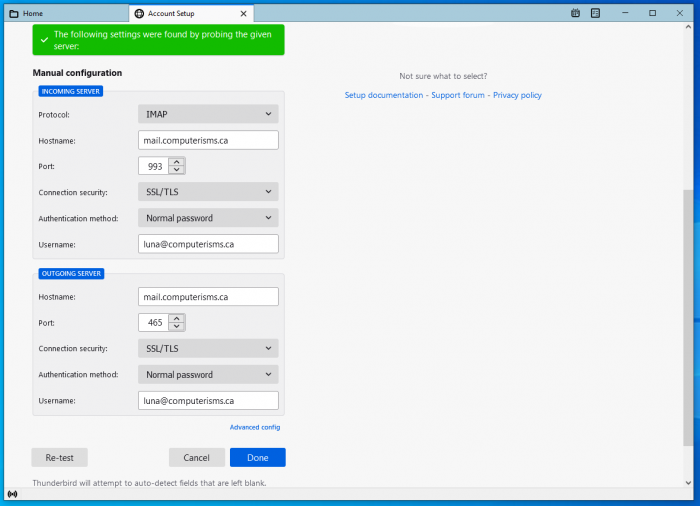
  • If this is your first time starting Thunderbird, it should automatically come up with a Set Up Your Existing Email Account page as shown in the image. If you already have accounts set up and are looking to add another, click on Local Folders in the lefthand menu bar and then Email under "Set Up Another Account"
  • Enter your Name, Email and Password and click on Continue
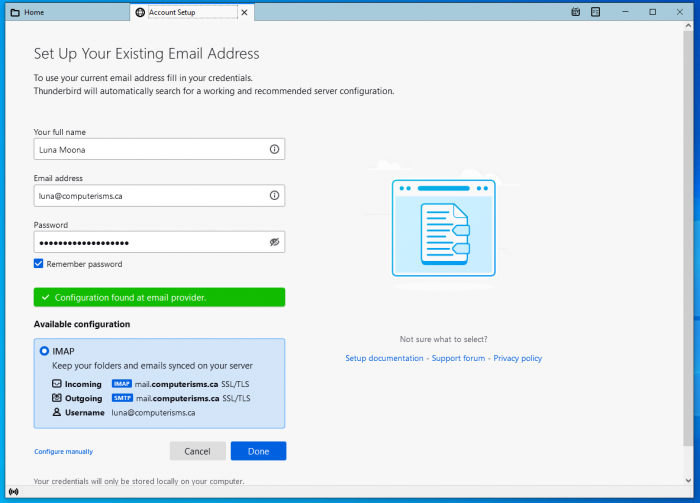
  • Verify that the server settings say the following (replacing domain.tld with your Computerisms hosted domain):
    • Incoming: IMAP mail.domain.tld SSL/TLS
    • Outgoing: SMTP mail.domain.tld SSL/TLS
    • Username: youremailaddress@domain.tld
  • If everything looks good, hit Done, and your setup should be done! If not, click on Configure manually
  • Make sure the Hostname for both Incoming and Outgoing Server is set to mail.domain.tld
    • If you are configuring IMAP, select IMAP under the protocol dropdown in the Incoming server section, select SSL/TLS for Connection Security, use port 993, and Normal Password authentication.
    • If you are configuring POP3, select POP3 under the protocol dropdown in the Incoming server section, select SSL/TLS for Connection Security, use port 995, and Normal Password authentication. (Note that we do not suggest POP3 setups except in special cases, ask us for more info if needed)
    • For SMTP, select SSL/TLS, use port 465 and Normal Password authentication.


  • Make sure that for the Username under both Incoming and Outgoing your full email address is filled in
  • Click on Re-test, and if you see a message like the one in the green box in the picture, hit Done
  • Your email is now setup! If you'd like, send a email to yourself to test functionality

Calendar

Before you begin:

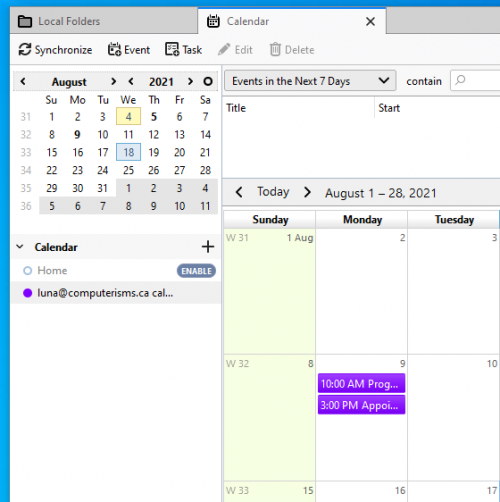
  • Open your Thunderbird email client and click the Hamburger Menu icon next to the search bar (three lines stacked on top of one another)
  • Select New, and then select Calendar...
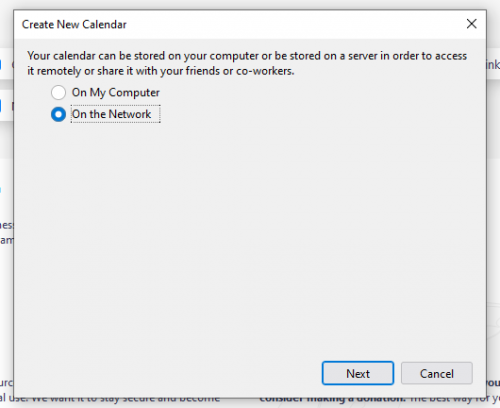
  • In the window that opens, be sure to select "On the Network", then click Next
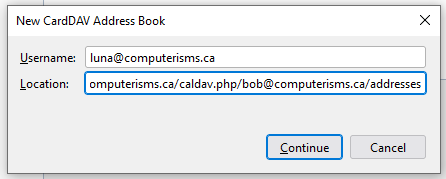
  • Enter in your email address in the Username box
  • The value you need to enter for Location consists of two parts:
  • Put a check mark beside Offline Support if you want to be able to read this calendar when you are not connected to the internet
  • Click on Find Calendars and let it search
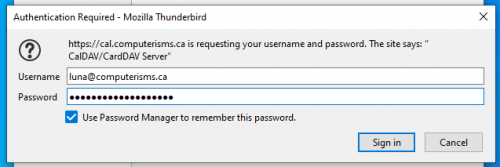
  • At this point, Thunderbird will want you to type your password to access the calendar
    • This is the same password as you use to log into your email account
  • Select USe Password Manager to remember this password. to allow Thunderbird to save the password for later use (so it doesn't have to prompt you every time the calendar syncs)
  • Thunderbird should have detected your Calendar and be asking for Calendar Type; You want to select CalDAV for use with our calendar system
  • If you wish to change anything about the calendar in Thunderbird itself (Name, Colour, Reminder Support, Read Only, etc) click on Properties next to the calendar and edit to your hearts content
  • Once done, click on Subscribe! Congrats, your calendar has been added to Thunderbird

Shared Address Book

Before you begin:

  • You need to install the Cardbook addon for Thunderbird
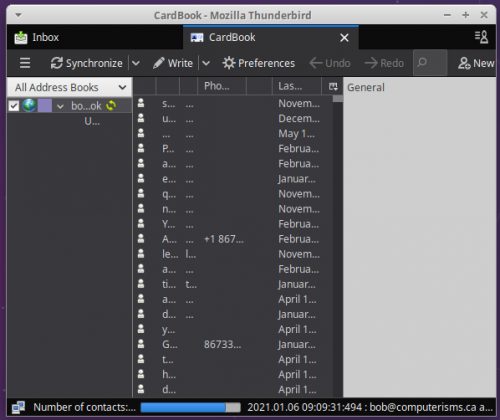
  • Open your Thunderbird email client and click on the Cardbook icon to open up the Cardbook tab
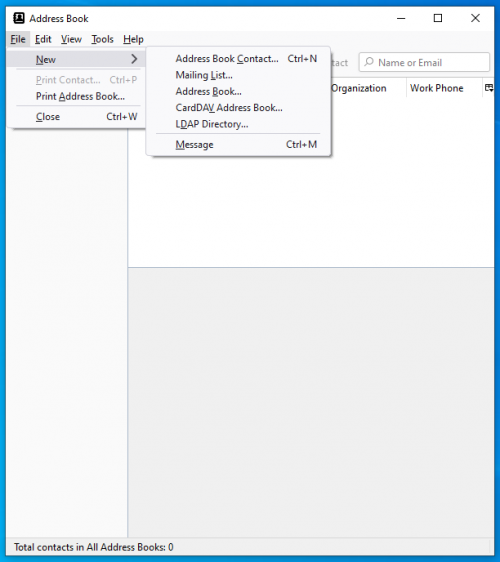
  • Right click in the very leftmost column, and select New Address Book
  • In the window that opens, be sure to select "Remote", then hit next
  • In the next window, ensure under Type that CardDAV is selected
  • The value you need to enter for Connection consists of two parts
  • The Username and Password should be your email address and email password, unless otherwise specified
  • Click on validate; If the Next button becomes available, a cardbook was found at the address specified with the credentials you inserted
  • At this point, Thunderbird will want you to name the address book.
    • The name is arbitrary, it can be anything that is meaningful to you. Thunderbird does not care what you name it, only that you name it.
  • Choose a different colour if you wish, and deselect "Show Reminders" if you don't want them
  • Leave the vCard setting as default
  • Make sure that Selected and Work Offline are checked, and Use urn:uuid is unchecked
  • Click on Next, then Finish
  • You're done! You should see the list start to propegate with contacts from the server as it does it's initial sync
    • This may take a while to complete fully depending on the size of your address book, so be patient!

Extra Notes