How to import Certificate Authority on MAC: Difference between revisions

From help.computerisms.ca
Jump to navigation Jump to search
No edit summary
No edit summary
Line 7: Line 7:
         http://help.computerisms.ca
         http://help.computerisms.ca


|[[image|center|500px]]
|[[1website.png|center|500px]]
|-
|-
|[[image:Win10step2.png|center|500px]]
|
|
*Scroll down and Click on "The Certificate Warnings Issue"
*Scroll down and Click on "Security Certificates"
|-
|-
|
|
*Under the FAQ section right click on the first link and click on "Save Link As"
|[[File:Win10step3.png|center|500px]]
|-
|-
|[[File:Win10step4.png|center|500px]]
|[[File:2websiteDownload|center|500px]]
|
|


Line 35: Line 31:


*Click on the Windows Start menu
*locate the certificate that you downloaded earlier
 
*change the file extension from ==.pem to .cer==
[[File:3changeName.png]]


Revision as of 16:22, 16 September 2019

How to download Computerisms Certificate Authority

  • Open your preferred browser and navigate to:
        http://help.computerisms.ca
center|500px
  • Scroll down and Click on "Security Certificates"
  • Under the FAQ section right click on the first link and click on "Save Link As"
File:2websiteDownload
  • Save the file on your Desktop
    • Note: you can save the file anywhere you wish but this tutorial assumed that you saved it on your Desktop

How to install Computerisms Certificate Authority into your Windows 10 Operation System


  • locate the certificate that you downloaded earlier
  • change the file extension from ==.pem to .cer==


  • Search for certmgr.msc and press Enter
  • Right click on the Trusted Root Certification Authorities


  • Place your mouse cursor on the All Tasks tab and click on Import
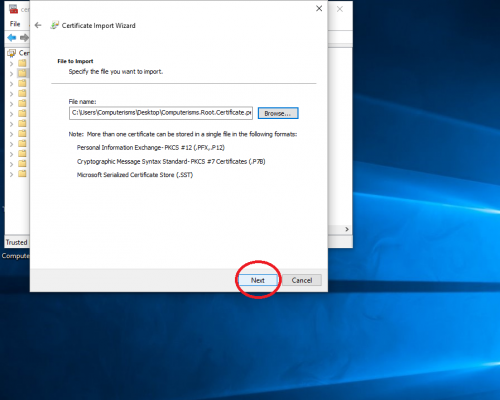
  • Click on the Next button in the Certificate Import Wizard
  • Click on Browse button in the Certificate Import Wizard
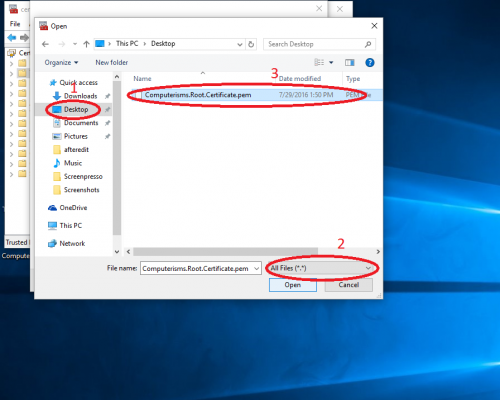
  • Step 1: Navigate to your Desktop


  • Step 2: Change the drop down menu to "All files"


  • Step 3: Select the Certificate from Desktop and than click on open
  • Click on the Next button in the Certificate Import Wizard
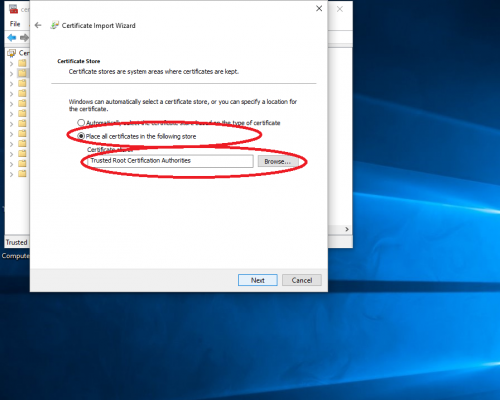
  • Make sure that the "Place all certificates in the following store" is checked and the "Certificate store" is "Trusted Root Certification Authorities"
  • Click Next and than click on Finished
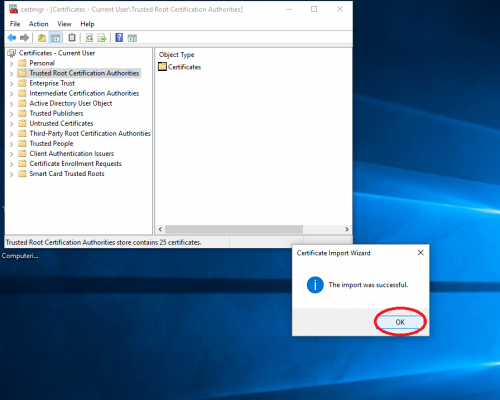
  • The pop up message should say "The import was successful."