How to import Certificate Authority in Windows 10: Difference between revisions
Jump to navigation
Jump to search
| (14 intermediate revisions by 4 users not shown) | |||
| Line 1: | Line 1: | ||
If you are confused after being redirected here from "How to Import Certificate Authority in Outlook", please understand the instructions here are the same steps required to get Outlook working. | |||
==How to download Computerisms Certificate Authority== | ==How to download Computerisms Certificate Authority== | ||
{| style="width:100%" border="0" cellspacing="0" cellpadding="20" style="font-size:120%; | {| style="width:100%" border="0" cellspacing="0" cellpadding="20" style="font-size:120%; | ||
| Line 9: | Line 11: | ||
|[[File:Win10step1.png|center|500px]] | |[[File:Win10step1.png|center|500px]] | ||
|- | |- | ||
|[[File: | |[[File:Windows10SecurityCertificates.png|center|500px]] | ||
| | | | ||
*Scroll down and Click on "The Certificate Warnings Issue" | *Scroll down and Click on "The Certificate Warnings Issue" | ||
| Line 32: | Line 34: | ||
|- | |- | ||
| | | | ||
*<b>Required: Before continuing this section please complete [[How to import Certificate Authority in Windows 10#How to download Computerisms Certificate Authority|How to download Computerisms Certificate Authority]]</b> | *<b>Required: Before continuing this section, please complete [[How to import Certificate Authority in Windows 10#How to download Computerisms Certificate Authority|How to download Computerisms Certificate Authority]]</b> | ||
| Line 39: | Line 41: | ||
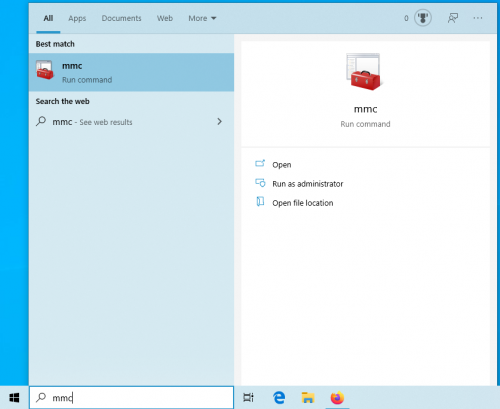
*Search for | *Search for MMC, and press Enter | ||
||[[File:Win10step5.png|center|500px]] | ||[[File:Win10step5.png|center|500px]] | ||
|- | |- | ||
||[[File:Win10step6.png|center|500px]] | ||[[File:Win10step6.png|center|500px]] | ||
| | | | ||
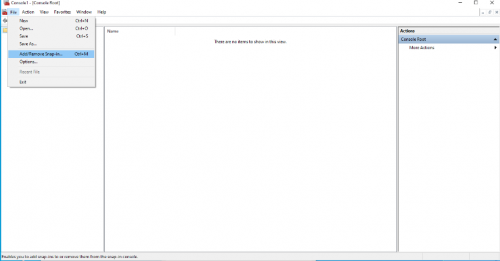
* | *Once the MMC application opens | ||
* | *Click on the File tab and add/remove snap-in... | ||
|- | |- | ||
| | | | ||
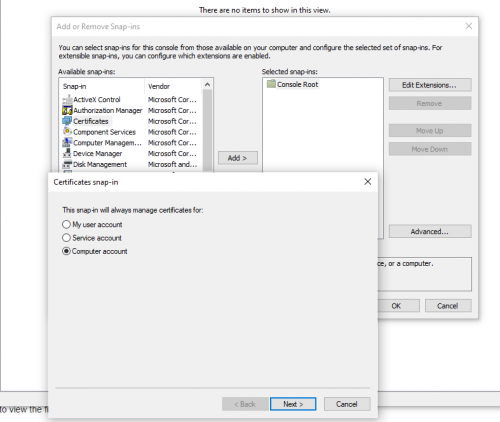
* | *Highlight certificates in the available snap-ins section and click Add | ||
*Once the certificates snap-in window appears, click computer account then Next | |||
||[[File:Win10step7.png|center|500px]] | ||[[File:Win10step7.png|center|500px]] | ||
| Line 57: | Line 62: | ||
||[[File:Win10step8.png|center|500px]] | ||[[File:Win10step8.png|center|500px]] | ||
| | | | ||
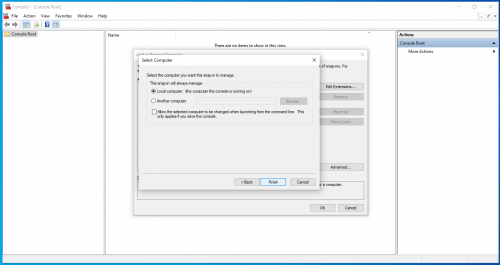
* | *Select Local Computer, then click Finish | ||
|- | |- | ||
| | | | ||
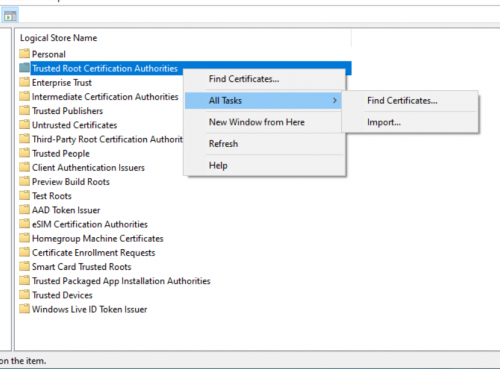
* | *Once the Snap in window is closed, look for the area in the middle section with "Certificates (Local Computer)" | ||
* | *Double-click to open it, which should show you an image as shown to the right | ||
* | *Right-click "Trusted Root Certification Authorities", and select All Tasks -> Import... | ||
||[[File:Win10_CA_Install_revised1.png|center|500px]] | |||
|- | |||
||[[File:Win10step9.png|center|500px]] | ||[[File:Win10step9.png|center|500px]] | ||
| | | | ||
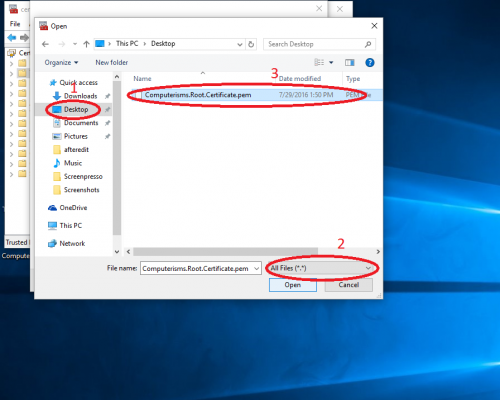
* | *This will open the Certificate Import Wizard. Hit next, then click on Browse and search for the certificate you had downloaded earlier. Once it's selected click on Next. | ||
|- | |- | ||
| | | | ||
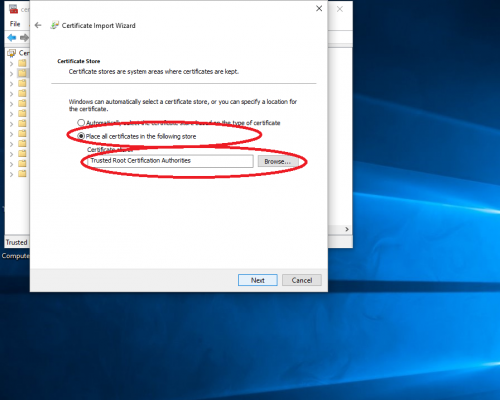
*Make sure that the "Place all certificates in the following store" is checked and the "Certificate store" is "Trusted Root Certification Authorities" | *Make sure that the "Place all certificates in the following store" is checked and the "Certificate store" is "Trusted Root Certification Authorities" | ||
*Click Next and | *Click Next and then click on Finished | ||
||[[File:Win10step11.png|center|500px]] | ||[[File:Win10step11.png|center|500px]] | ||
|- | |- | ||
||[[File:Win10step12.png|center|500px]] | ||[[File:Win10step12.png|center|500px]] | ||
| | | | ||
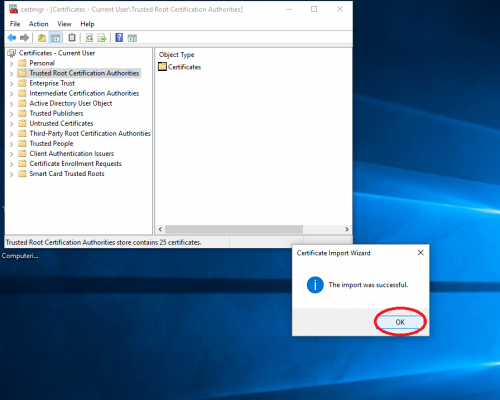
*The pop up message should say "The import was successful." | *The pop-up message should say "The import was successful." | ||
|} | |} | ||
==How to install Computerisms Certificate Authority into your | ==How to install Computerisms Certificate Authority into your Thunderbird mail client== | ||
{| style="width:100%" border="0" cellspacing="0" cellpadding="20" style="font-size:120%; | {| style="width:100%" border="0" cellspacing="0" cellpadding="20" style="font-size:120%; | ||
|- | |- | ||
|style="width: 50%"| | |style="width: 50%"| | ||
|- | |- | ||
||[[File:Tbstep1.png|center|500px]] | |||
| | | | ||
*<b>Required: Before continuing this section please complete [[How to import Certificate Authority in Windows 10#How to download Computerisms Certificate Authority|How to download Computerisms Certificate Authority]]</b> | *<b>Required: Before continuing this section please complete [[How to import Certificate Authority in Windows 10#How to download Computerisms Certificate Authority|How to download Computerisms Certificate Authority]]</b> | ||
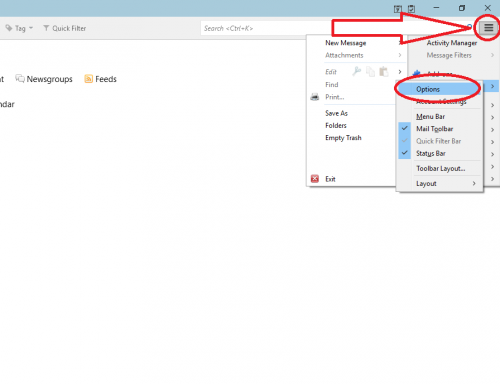
*To add the certificate to | *To add the certificate to Thunderbird, start by opening Thunderbird | ||
*Click on the top right menu bar (looks like 3 horizontal lines) | |||
*Click on <code>Settings</code> and then <code>Settings</code>, or <code>Preferences</code> and then <code>Preferences</code> | |||
|- | |- | ||
| | | | ||
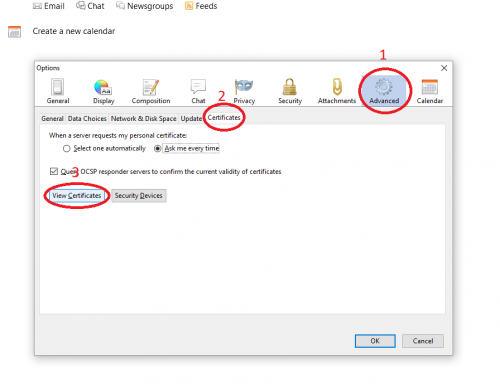
*Step 1: Click on | *Step 1: Click on <code>Advanced</code> in the left menu bar | ||
*Step 2: Select the Certificates tab in the top menu bar | *Step 2: Select the <code>Certificates</code> tab in the top menu bar | ||
*Step 3: Click on | *Step 3: Click on <code>Manage Certificates</code> | ||
||[[File:Tbstep2.png|center|500px]] | |||
|- | |- | ||
||[[File:Tbstep3.png|center|500px]] | |||
| | | | ||
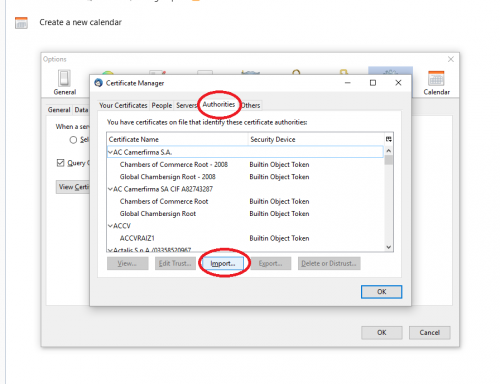
*Click the Authorities section tab | *Check under <code>Your Certificates</code>, <code>People</code>, and <code>Servers</code> for any listings relating to Computerisms; If they exist, delete them | ||
*Click the <code>Authorities</code> section tab | |||
*Verify the Computerisms Certificate Authority is not listed (the list should be in alphabetical order) | |||
*Click the <code>Import</code> button | |||
|- | |- | ||
| | | | ||
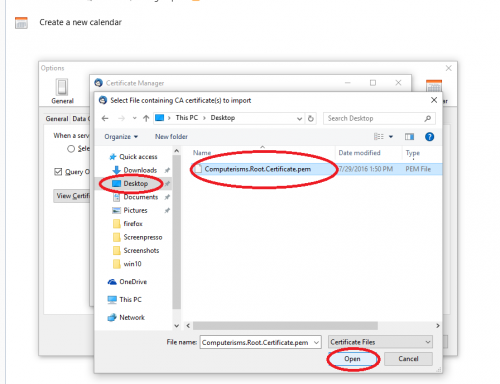
*Navigate to the | *Navigate to where you had saved the Certificate Authority, and select it (you may need to use the drop-down box to allow you to see all items) | ||
*Click on | *Click on <code>Open</code> | ||
||[[File:Tbstep4.png|center|500px]] | |||
|- | |- | ||
||[[File:Tbstep5.png|center|500px]] | |||
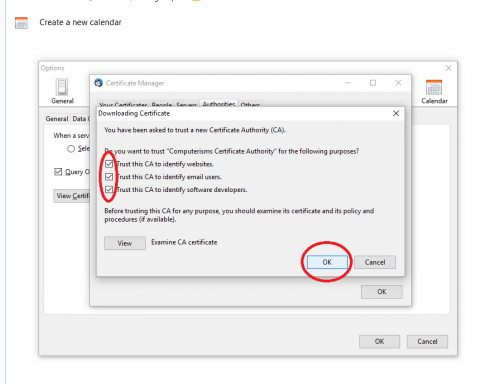
| | | | ||
*Check all the options and click on OK | *Check all the options and click on OK | ||
| Line 132: | Line 145: | ||
*Note that the last option, "Trust this certificate for identifying software makers", is not required. You may leave this unchecked, but the other 2 options are required. | *Note that the last option, "Trust this certificate for identifying software makers", is not required. You may leave this unchecked, but the other 2 options are required. | ||
|} | |} | ||
Latest revision as of 00:09, 3 December 2020
If you are confused after being redirected here from "How to Import Certificate Authority in Outlook", please understand the instructions here are the same steps required to get Outlook working.
How to download Computerisms Certificate Authority
http://help.computerisms.ca |
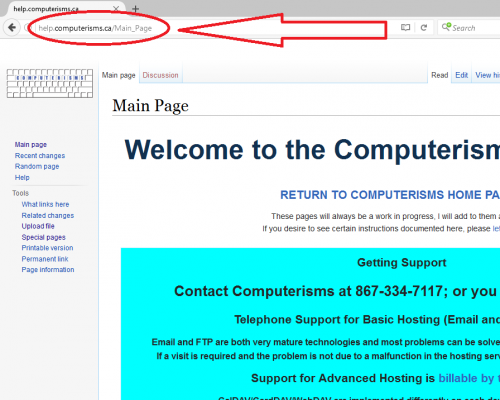 |
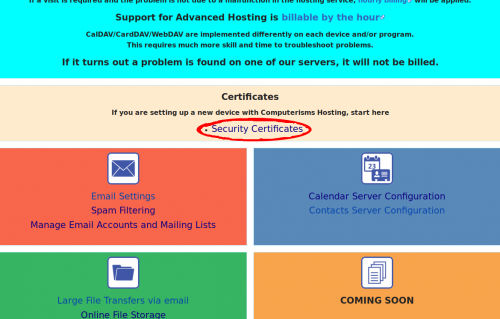 |
|
|
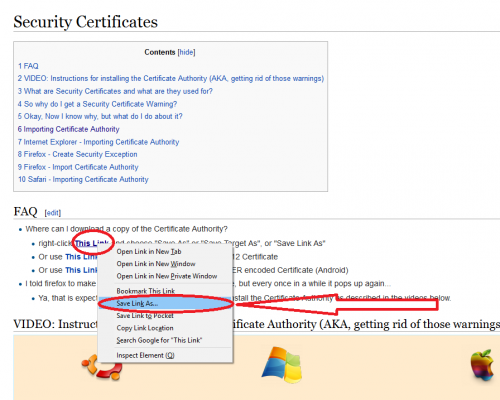 |
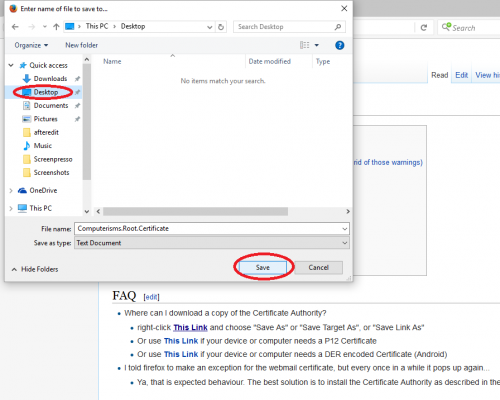 |
|
How to install Computerisms Certificate Authority into your Windows 10 Operation System
|
 |
 |
|
|
 |
 |
|
|
 |
 |
|
|
 |
 |
|
How to install Computerisms Certificate Authority into your Thunderbird mail client
 |
|
|
 |
 |
|
|
 |
 |
|